3/31/09

Grandkids~

Here are some photos of my two grandkids. Over the weekend I bought my grandaughter two wigs....yes, you read it correctly, wigs. She turned one month on March the 13th...and I was wanting to see her with long hair....so here she is in all her glory~ She didn't care to much for the dark hair........ I think she is in a "milk-coma" in this photo~Here she is working the reddish hair...... work it girl! Look down your nose at the world... you go girl~Here she is falling over-- she is only a month old lol~Lastly, my grandson shows his sister how to model... attitude, its all in the attitude~
he is such a HAM!! Here he is with a toy ladder stuck on his nose!Alright, alright... I'll stop :-P

3/30/09

Trash to Treasure~

This trash to treasure is being hosted by Kari & Kijsa.
Here is a chicken wire wreath that I picked up for .70cents from a thrift store. It was already painted pink...so I just added some copies of old photographs that I had. I glued the photos to old yellowed book pages, punched a whole at the top of each photo and tied it to the wreath with some lace. I then cut out some leaves....but seeing it completed, they look like butterflys. Better yet! This wreath is going out onto my front yard patio. You can see that transformation here. It is an ever-evolving work in progress~ This photo of the mother holding her baby is my favorite...so sweet~

2nd Time Around Tuesday

I bought these two plastic cherubs awhile back for $2 bucks each. They were gold with no embellishments. *gasp* Life is to short not to go around wearing a party hat 24/7....I'm sorry, life is to be celebrated!!Whenever I see these gold cherubs I pick them up and make them "happier" and pass them along to other people.Here are the two with a fresh coat of white paint and some brown paint to distress the harsh white... I covered the plastic draping with real fabric and added a party hat to both of them. The "boy" wearing the blue hat has been shipped to Karen in MN and the "girl" wearing the pink party hat is for my grandaughter Chloe. I had to add more to Chloe's cherub as she would expect that from her Nana~ Sooooooo I added a bit of a vintage pearl necklace, added some feathers to the cherubs wings... painted the toe nails-- pink of course. Topped it all off with a rose colored tutu with a rose belt~ (it shows up darker in the photo than it really is)
Here is a close up of the little cherub~

I would suggest if you ever see these gold cherubs to buy them and release their inner happiness with a coat of paint and a party hat~
You can find more 2nd hand treasures over at "A Picture is Worth a $1,000 Words"

Mmm Mmm Monday~

I can't believe I haven't shared this recipe yet...its one of my all time favorites.... if you love banana bread you'll love these banana crumb muffins :-) Banana Crumb Muffins
1 1/2 cups all-purpose flour
1 teaspoon baking soda
1 teaspoon baking powder
3 bananas, mashed
3/4 cup white sugar
1 egg, lightly beaten
1/3 cup butter, melted
1/3 cup packed brown sugar
2 tablespoons all-purpose flour
1/8 teaspoon ground cinnamon
1 tablespoon butter
1. Preheat oven to 375 degrees. 2. In a large bowl, mix together 1 1/2 cups flour, baking soda and baking powder. In another bowl, beat together bananas, sugar, egg and melted butter. Stir the banana mixture into the flour mixture just until moistened. Spoon batter into muffin cups. 3. In a small bowl, mix together brown sugar, 2 tablespoons flour and cinnamon. Cut in 1 tablespoon butter until mixture resembles coarse cornmeal. Sprinkle topping over muffins. 4. Bake in preheated oven for 18 to 20 minutes, until a toothpick inserted into center of a muffin comes out clean.

3/28/09

Robins egg~

Here is another little somethin'-somethin' I made for my swapping buddy. I really like how it turned out.... Here is the outside...and the inside...and a close up of the little soldered egg inside of the larger egg :-)

3/26/09

Stuff~

I haven't had much time to be artsy fartsy lately, but I have finished up two things that are going to my Easter swapping partner. I altered this tin egg into a nice container that is going to hold that little egg cup with the little fairy sitting atop the grass. (the fairy is two sided) The paper covering the egg is from a book from the 1800's. I am also sending along one of these cherubs...(the one with the blue party hat) I love making these-- they make me chuckle. The one with the pinkish party hat is for my grandaughter Chloe~ The plastic "drape" on these statues I cover with real fabric, it takes some time, but I think it looks better when its all finished. It is barely noticeable in these photos because I used a sheer fabric...but its there~
I am also working on a soldered piece and an robins egg container for that. I am hoping to have that completed tomorrow :-)

3/24/09

Two'fer One~

Its a two'fer one post....and.....
I am making over my front patio area for the upcoming summer months. Most everything on my patio is from thrift stores or yard sales! Here is the messy/unkept before photo~ Here is the after photo..... It doesn't show up well, but there is a huge flower ball hanging from the center of the gazebo :-) Alright, it is not a HUGE difference... but I did do a lot. I added stuff, pulled the weeds out of the brick, built an arch/planted some climbing roses.... and added some fabric to the table! Scroll down to see the photos :-)I don't do anything to the porch area during the winter months as it is toooooooooo cold for me to work out in the yard! I purchased the round gazebo a few years ago from Big Lots for only $200 buckeroos~ The white chairs are from a thrift store.... (I once had them inside my house) The metal table was another thrifted find ($40 bucks) All the "extra" odds and ends and doo-dads are things that I don't really want anymore-- and wouldn't be to terribly upset if they were stolen misplaced. I used a duvet cover from the Pottery Barn to make a table cloth and I also covered some pillows and covered a small bench and used some of the fabric as ribbons on some of the statues.... I think its cute. Again, my thoughts are "more is better" The little metal fence pieces I picked up for $1 buck each. I got a total of 5!I used wire to attach them to the gazebo and then I covered the wire with a torn fabric ribbon-- caute! This little angel I wired directly to the small rose bush as our paper boy man is probably a retired pitcher from some baseball team because he seems to hit everything I put outside. The bird bath was $15, the bird house was $2, the 2 miniature rose bushes with the pottery pots were $3 each.This cement urn was a dollar at a yard sale.... I added the nest, moss and the dried flowers & eggs...Here is a bunny wearing a matching ribbon made with the same fabric as the table & bench~ (I bought 5 bunnies for a dollar each) the white wire bird cage was $10 bucks (still working on straighting that sucker out) The "welcome" sign was $2 bucks...Here is a little rusty tricycle given to me by a friend that I spruced up... I don't really have a place for it just yet...but it will work its self into some little spot. The basket was $1 buck lolThis wooden "object de'art" for lack of a better word is just filled with more odds & ends. All of this "stuff" was free or nearly free. The broken shovel head says it all "Garden of Weedin" A rusty wagon also given to me by a friend..... filled with stuff sits in a planter near the gazebo... all the pots also were given to me~Here is a little half table that has no place inside anymore...so out it went onto the patio. (yes, thats dirt on the top of it, it just recently rained!) The rose in the pot was $1, the metal candle stick with the glass top was .50cents, the bunnies with the pots were $2 bucks (I have two) The heart wire bird cage was $3 bucks, the table itself was $3 bucks... the metal bird feeder on the ground was $7, the blue flower pot was $3~This two balled wire topiary form is one of 3 that I picked up for $1 dollar each. I just used some silk ivy greenery I had stashed away to make it come alive~ see my two wooden cats in my window.... I love cats.This wrought iron bakers rack my dad made.... now it holds a lot of my overflow from my house. The white truck behind it is a 1964 (year I was born) Falcon truck it was a gift for one of my birthdays from my hubs.This white basket was a freebie at a yard sale. It is perfect for holding long stemmed roses and cuttings from plants that I can easily transport to my gardening bench. (which is the table lol) this summer I will cut a piece of wood for that big whole in the middle. I think I'll drill around the wood circle and lace it to the metal basket with wire~This white metal stand was $5, the bird house $1, the vintage wooden 7-up crate on the bottom shelf was $1. The large blue pot was $5-- which holds another one of those 2 tiered topairy forms ($1)
I picked up the wire tray for $1, the wire teapot was .50cents, the wire cups & saucers .25cents and the metal plant stand $2 .....and just attached everything together with wire for this little vinette. The black garden thingy was $1.If you would like to see more make-overs stop over at Jens blog "Sanctuary Arts at Home" she is hosting a monthly Mr. Linky for make-overs! *woot-woot*
If your wanting to see other peoples Thrift store finds check out the Mr. Linky over at Dianes blog "A Picture is Worth a $1,000 Words" If you have linked here and wish to view more of my blog you can click here!

3/23/09

Mmm mmm Monday~

I am trying out a new quiche recipe for Easter Sunday.... this one was pretty good-- although it had to much meat for me! I think I would cut the meat/sausage by half next time~ Here is the recipe:
Sausage Mushroom Quiche
1 pound small fresh button mushrooms
1 pound ground pork breakfast sausage
1/2 cup chopped fresh parsley (I know, thats a lot!)
3 eggs
1 cup half-and-half cream
1/2 cup grated Parmesan cheese (I used the cheese you sprinkle on pizza) 1 (9 inch) unbaked 9 inch pie crust
Preheat oven to 400 degrees. Prepare the mushrooms by snipping off the stems. Cut in half if large. Crumble the sausage in a large skillet, add the mushrooms, cook on medium-high heat until the meat and mushrooms are lightly browned and all the liquid from the mushrooms has evaporated. Drain off the grease. I even took some paper towels to the meat, this will help your quiche cook better if it is not so greasy. After all that, add the parsley. (I wouldn't add as much as what the recipe calls for, thats a lot of "green" lol)
In a large bowl, beat the eggs, adding the cream and cheese. (again, I just used the parmesan cheese you sprinkle on top of pizza!) Pour into the mushroom/sausage mixture; blending well. Pour mixture into the pie shell. Bake in preheated oven for 25 to 30 minutes, until crust is browned and the filling is set. Let stand 10 minutes before serving.

3/22/09

Spray paint party!

I really love to paint things, especially white! I've got 3 bins in my garage full of spray paint in different colors :-) All organized by color of course~ I've used spray paint for stenciling onto wood/cars/cement etc., painting on things directly to give them new life...highlighting details on things... and adding "age" to other things. I love me a good can'o paint!
This Easter tree got a complete make-over, it used to be one of those skinny white trees, now its a fuller tree with a brown trunk & limbs.. you can see the tutorial here. Here is a $3 dollar find that was hand cut by someone years ago. It is really intricate when you look at it up close. When I bought it it was in its natural wood state.... I think it really pops now that it is spray painted white...
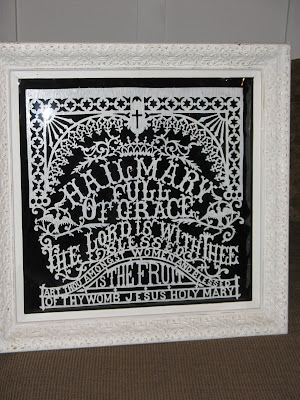
A vintage style basket that got the pink treatment...(soon to be an Easter basket for my swapping buddy)one of my "block sale" shopping carts got some white paint to freshen it up a bit.Here is a 3 piece set that I picked up for $5 bucks that with the white paint really is adorable now :-)Here is a small oak dresser that I grabbed off of a trash pile..... I put a base coat of latex paint over the wood to seal it then I spray painted over that to give it a nice smooth finish. Of course I had to grubby it up a bit, I like a nice shabby look to things. (yes, I keep the plastic on my lampshades, it gets very dusty where I live!)I made this "map" tablecloth for the yearly pirate party I have for my grandson's birthday. I simply spray painted right onto the fabric to give it an old dirty look~Speaking of pirate party...here is the pirate ship! I spray painted parts of it brown and used some black spray paint to give it an aged/dirty look. Those pirates are a dirty lot!!Okokok....now I'm just showing off in this photo...didn't it turn out soooooooooo caute? The green plastic cabin of the boat was the bottom section of a two tiered play house that I got for free. I got the base at my house, and my daughter has the house/cabin part at her house :-)

Here is a $4 dollar chandelier that I spray painted white that sits over my kitchen table. I wasn't sure if I wanted one, so I picked up one of those "brass" yucky ones and painted it. NOW.... I am in the market for one of those blingy over the top dripping with crystals chandeliers :-)You can see more spray paint party goers by visiting Sara at her blog "Thrifty Chick Decor" If you want to check out more of my blog you can click here :-)

3/20/09

Vogue.....

Strike a pose....Here is my grandaughter Chloe (one month old) smiling and posing for the camera...Wait....what the heck is going on here?MAMA....get my brother Jonathan away from meeeeeeeeeeeeee~Jonathan always wants to snuggle with Chloe...and every time she cries!

3/19/09

Revamped Easter Tree~

Here is a little Easter tree that I picked up second hand for $3 bucks. It came with a lot of really cute wooden ornaments--- the tree was a tangled mess of branches and ornaments. I thought this would be a great tree for my two year old grandson to play with.... but those spiral brances and the long thread hangers on the ornaments were not a good combination for a toddler. Here is the before photo~Sooooooooooooo I fixed it.... here is the after photo of the same Easter tree.Here is how I did it if anyone is interested :-)
I took a good look at the tree and decided it needed more branches for starters...and a better/simpler way of attaching the ornaments. I cut off the excess wire on each existing branch and then I used my pilers to bend the remaining wire into little circles. This really streamlined the tree into a better shape. I then started adding more branches to the tree. I used the heaviest wire I had in my "wire stash" and simply attached some of the previously cut off wire from the tree that I formed into straight bits with loops at the end. I used regular masking tape that I cut into lengths of about 3 to 4 inches and then I cut those in half length wise. This worked out really well! I then used the thin pieces of tape to attach the brances to the tree trunk.... then I used a wide piece of tape over that to secure it completely. Easy-peasy~Now that the tree was a little fuller and the loops were all in place. I decided that the whole thing needed to be painted. What color to paint it was the hardest part of this whole make-over..... paint it a pastel color?? paint it brown like a tree?? I figured brown would hold up better to little grubby hands-- and would be easier to touch up if need be in the future. After the tree had been painted I made a box out of foam core that fit snuggly into this cute little metal container. I didn't want to commit to having this tree in this container permanently, so this was the next best thing.I went over each inside seam of the foam core box with some additional hot glue to seal the box really well because the next step was to add some plaster of paris to secure the Easter tree base inside the foam core box. I added some scraps of foam core to raise up the tree's base.Then I mixed some plaster of paris and poured it around the base that was pearched inside the foam core box. While the tree base was setting up I turned my attention to the ornaments. I pulled out the strings in each ornament and went to work drilling a hole into each one...The drilling was pretty easy...I wore a glove on my hand holding the tiny ornaments just in case I slipped with the drill.Then I pulled out of my "wire stash" some Christmas ornament hooks. (I always pick those up at the after Christmas sales, they are perfect when your needing just a "little bit" of wire) Anywho, I cut each wire into two pieces, curled up one end to make a "hook" and glued the straight bit (obviously) into each tiny hole (that I had previously drilled) using E6000 glue. Next, I cut some leaves out of felt...I just randomly cut shapes while watching/listening to the t.v.......and then just used hot glue to attach them to the tree and also to the ornaments. I then turned my attention back to the tree. To the top of the tree to be exact. I pulled down the two wires I left on top of the tree and bent them down and up and attached...a small birds nest to the tippy-top. I then glued some green leaves around the base of the birds nest just to pull it all together~ I didn't glue the bird into the nest. Who knows, my 2 year old grandson might like a car in that nest! lolTo cover up the plaster in the base, I cut a piece of yellow felt to cover the stark white plaster. I then filled in the top of the container with some yellow paper shredding. I used paper because I have 3 indoor cats that are eventually going to nibble this I'm sure!Here is the newly revamped Easter tree waiting to be played with. Taaaaaaaaa daaaaaaaaaa instant caute!!

3/17/09

Happy Saint Patricks day~


3/16/09

Mmm Mmm Monday~

Banana Crumb Muffins~
1 & 1/2 cups all-purpose flour
1 teaspoon baking soda
1 teaspoon baking powder
3 bananas, mashed
3/4 cup white sugar
1 egg
1/3 cup butter
Optional: Walnuts

Crumb topping:
1/3 cup packed brown sugar
2 tablespoons all-purpose flour
1/8 teaspoon cinnamon
1 tablespoon butter

1. Preheat oven to 375 degrees Instead of using regular cupcake papers, I use Souffle muffin cups (the 3 1/4 oz cups) these hold up really nicely in the oven and you don't have to put them into a "cupcake" pan. They also make whatever you bake in them very moist, perfect for breads that normally get dried out while baking.
2. In a large bowl, mix together 1 & 1/2 cups flour, baking soda and baking powder. In another bowl, beat together bananas, sugar, egg and butter. Stir the banana mixture into the flour mixture just until moistened. Then add walnuts if you like..... I like! I like! Spoon batter into prepared muffin cups about half full.... I always add to much, I can't help it... then it dribbles down the sides making a mess! 3/4ths full makes them just crest the top of the muffin cups...so try not to exceed that amount!
3. In a small bowl, mix together the brown sugar, 2 tablespoons flour and cinnamon. Cut in 1 tablespoon butter until mixture resembles coarse cornmeal. Sprinkle topping over muffins. Make sure you mix the butter in very well... you don't want any large bits as this is what melts and makes a mess out of your muffins....
4. Bake in preheated oven for 18 to 20 minutes, until a toothpick inserted into center of a muffin comes out clean.
These are REALLY good. I make them ALL the time-- everyone LOVES them!

3/15/09

Little rusty wagon~

Alrighty...here is my little rusty wagon's before....And here it is after~It will evolve as I come across more things to place in the wagon. I am not loving the bird cage-- so it might have to be moved. I need to add more of the dark green moss and some more rocks, feathers and other fun things. Like everything else, it is a work in progress! It seems every other year I use it as a planter.... this year its all about filling it with garden things~
Here is something I made for the center of my porch table.... I would like a beautiful plate to place this on, but for now I am using a woven plate to keep the moss off of the tablecloth. All of the things were from different thrift stores bought at different times...the nest, flowers, the eggs even the cloche. It isn't as grand as I thought it would be...so I'm on the lookout for something cuter as the tables center piece :-)

3/14/09

Monster....

truck show! My son-in-law and I took my 23 month old grandson to see the Monster Truck Show. He absolutely LOVED it to pieces. Here he is telling me "big truck"and here he is telling me again only louder and pointing with two pointy fingers "BIG TRUCK" just incase I missed the ginormous trucks with deafing sounds racing around the indoor arena!Lastly, a photo with his little ear muffs on to help drown out the loud sounds of those huge powerful engines. Yeah... he wore them for about two seconds~ This kid LOVES his cars & trucks....on the drive home he was commenting on the other vehicles saying: "big truck"...thats a car, thats a red car, thats a truck and laughing with joy.... he totally cracks me up~ Here is a little video of what we saw!

Lovely weather....

Still plugging away here & there on my front porch makeover.... The completion date of March the 25th is fast approaching! Here is an adorable rusty old tricycle that one of my friends gave me about 3 years ago. Am I a lucky girl or what? She also gave me a rusty old wagon too... stay tuned to see what I do with that~ (geeze, I sound like I'm all that don't I lol)I've had this little bike sitting amongst some plants in my flower bed for awhile..... I found the wicker bicycle basket for a dollar and the flowers were given to me by another friend...taaaaaa daaaaa instant caute!It really is darling. It looks as though a small child stepped off of it hiding it amongst the plants saving it just for them so no one else would get it.... and they never came back for it...and there it sat for years and years....waiting~

3/13/09

Blog Carnival!

Blog Carnival over at Lisa's blog "The Carnival Soiree"... come on over for some cotton candy and whatever other sweet treat your looking for~ Lately, I've been feeling more....Than.... but none the less...I am putting on my circus finery and attending this event! On with the SHOW! Here is what I'm wearing, a very classy gold number. I'll get a feel for the carnival and if its a little "naughty" I'll hike up the long gold part of this dress and show a little leg-- ok, a lot of leg! I many even show off my ruffled party panties! :-) Hmmmmm I am needing a hat....which one? So many to choose from..... Ah, this one will work....I like LOVE matchy-matchy!!
GASP.....whats this???? Well, would you look at that little devil! Take a closer look. Look what that sassy little bird has gone and done! She has started to build a nest right there on the brim of MY HAT! tisk-tisk-tisk...is nothing sacred? Would you just look in her eyes....seems as though she is bewildered as to why I am not happy about this! I am so going to eat some chicken at this Carnival, RIGHT IN FRONT OF HER!Here are some little butterfly wings and a tutu that I whipped up for my grandaughter Chloe, that along with a vintage one piece ruffled number should be super cute on her....Here is a close up of her little crown.... she is only one month old (yesterday) so the crown is tiny~ Here is Chloe trying out her wings.... she would much rather try out her little crown...she is looking around for her tiara as I think she rather enjoys being "in charge"

Head on over to Lisa's blog and check out the fun for yourself! But hurry, I hear the elephant broke lose and is knee deep in the cotton candy!

3/12/09

Works in Progress...

I am joining another Make~over party this month on the 25th. Hooray! Just enough "fire" under my butt to actually get motivated to accomplish something around my home! Anywho..... this month I am going to be making over my front patio area. I've been working on a table cloth and pillows for the table and chairs I have under my gazebo....here is a sneak peek of the "before"Here is the after of the table & chairs. I used a potterybarn duvet cover for the fabric :-)Here are some things that I recently picked up for my front porch make-over. All of this is from yard sales... the cement bird bath $15 bucks, the two rose bushes in pots $3 bucks each. The large mosiac bird house $2 bucks (I know what a steal!) The angel sitting on the edge of the pot was $5 bucks.
...stay tuned for more of the "after" pictures coming up on March the 25th. It is very pretty once its all set out. The funny thing is, I never sit out there and enjoy it because I've always got something I'm working on. I've also been making over an Easter Tree. I'll give a tutorial on how I did this...hopefully before Easter. I am hoping to make it more "toddler friendly" as those darn spiral branches and the long strings on the ornaments were to much for my 23 month old grandson to hang the ornaments from. The carnival soiree is fastly approaching.... I've got some things put together as little vinettes. I guess thats what I'm suppossed to do? Who knows.... and I don't think anyone cares!Lastly, of course....a crocheted project is ALWAYS sitting around somewhere as a work in progress. I wish I could stress to everyone just how easy it is to crochet and to start to learn today. There are excellent instructional videos on Youtube.com... just type in "how to crochet" in the search box. Sometimes when I come across a stitch I've never heard of before I google it...and up pops thousands of sites that show how to do that stitch. Now...go grab some yarn and a hook and please give it a try, you'll thank me I promise

3/10/09

Carnival Soiree~

<-----Here is what I'm going to be wearing to the Carnival Soiree that is being held this Saturday. It is a very pretty muted gold with a sheer gold fabric over the bottom of the skirt. But, it is kinda matronly isn't it? I can't have that now can I~

I took it in some, pulled up the sheer skirt to reveal the gold skirt underneath. (I was going to pull up the gold skirt as well, but hey, I AM a grandmother! lol) I also pulled up the lace that laid across the bust like a jacket... I just gathered it around the neck. NOW.... this is more like it! I think it now needs a little bit of bling, a few more touch ups and it will be perfect!

Of course I also made a sash with my blog name on it "Artsy~Fartsy" using some of the millions of ruffles I was making and some glittered letters. I think it turned out kinda cute.

3/9/09

2nd Time around Tuesday~

This week I am sharing a bowl and matching candle stick set I picked up this past weekend for a mere $5 bucks for the three piece set. It is kinda hard to see the "before" photo of the set as I've got it up against a bunch of "clutter"--- but hey, my house is full of clutter, so anywhere I put it you'd get the same look! I took the hanging crystals off, took the bowl off of the center stand.... placed tape over the white marble base and simply spray painted the set white. I cleaned and rehung the crystals, reattached the bowlie...and taaaa daaaaaa instant caute!If you'd like to see more 2nd time around treasures please visit Diane and her blog "A picture is worth a 1,000 Words" If you have linked here from Diane's blog and wish to view my blog you can click here I just posted a fabulous recipe for Apple Muffins-- YUM!

Mmm mmmMonday~

Here is a recipe for Apple Muffins. These are pretty darn good, if I do say so myself. Super easy to make and they taste like an apple pie but in muffin form :-) This girl likes loves her muffins!
Apple Muffins
2 cups flour
2 teaspoons baking powder
1 1/2 teaspoons cinnamon
2 cups packed brown sugar
2 eggs
1/2 cup butter (1 stick)
1 teaspoon vanilla extract
1 1/2 cups diced apples (any kind)
optional: 3/4 cup of raisins
Heat oven to 350 degrees. Mix together the flour, baking powder and cinnamon and set aside. Mix together the sugar, eggs, butter and vanilla until smooth. Gradually add the flour mixture until it is incorporated. Stir in the diced apples and the raisins (if you want raisins) then fill up your muffin cups, this recipe doesn't rise all that much, so you can fill the muffin cups pretty full. If you prefer to make apple bars.... coat a 13x9x2 inch baking pan with nonstick cooking spray and spread mixture into pan. Either way, muffins or bars, bake at 350 degrees for 35 minutes or until a toothpick inserted in the center comes out clean. Cool completely before cutting into bars if your using a baking pan~

These apple muffins are really good hot/warm....just like a hot pie. Actually, I think I prefer these more when they are warm. I guess you'll just have to try them both ways too.... hot and cooled to see what I'm talking about. Seriously, this recipe is a must try recipe.

3/5/09

Re-recovered dress form~

Well.... I re-recovered my sewing dress form that I puchased for $10 bucks this past summer. The dark fabric just seemed to be toooo dark, I still like it, but I was wanting a change. I made a cover that can be removed at a later date if I want to change it back! I started by covering the whole form with a thin layer of batting. I simply pinned it on and cut away the excess batting and stitched as I went. The whole thing can be pulled off to reveal the original dark fabric :-) I used foam core cut to size to fill in the arm holes. I poked yarn though the center of the foam so I could pull the foam core into place once the glue was placed on the form~This dress form is solid cardboard and it was always hard to pin things to, so I figured a little batting would help! Here is the dress form covered in batting~I then just draped some muslin fabric over the form and pinned & pinned & pinned. Then I just stitched along the pin lines..... and cut away the extra fabric and kept doing this until I finished the front & back. I added some foam core to the top of the dress form to hide the screw that makes the dress form bigger & smaller...I just taped it in place and filled in the gap with some batting. Then I just had to pin, cut and stitch the top.
I made a seam down the back that I didn't stitch closed. I simply pinned the back closed so I can remove it later if I want to. Taaaaaaa daaaaaaaaaaa new dress form~

3/3/09

Eeeeeek~

I have no idea what I'm to make or do for this "circus soiree" that I've signed up to attend over at Faerie Enchantment..... It would be nice if there were other people I knew that were going to be there.... if anyone would like to come along the event is being held on March the 14th. I think your suppossed to dress up in something circussy. And no, don't dress up like a clown and cuss~
Sooooooooooo while thinking "what-the-heck-am-I-to-do" I made ruffles. A lot of ruffles. There is something so calming about doing something over and over...well at least for me anyway. I better get back to my ruffles, I'm feeling overwhelmed again lol

Easter Basket...

Here is the basket that I'm going to use to hold all the "stuff" I'm going to be sending to my swap partner for the Vintage Easter swap. I need to get some lovely ribbon to wrap around the handle... I love the shape of this basket. I've got a vintage basket (that I'm keeping for myself I'm no dummy!) that is shaped just like this one. Here is the before photo of the basket~ I also picked up some chicks & rabbits from the dollar store. I especially love the chicks... the little chicks hop :-) I added some embellishments and taaaaaa daaaaa instant cauuuute!! Some are going to my swapping partner and some are going on my hutch! I may have to go buy some more of those chicks...they are so darn cute!! Don't they look happier now? There is still time if anyone is interested in signing up for this vintage Easter swap, you've got until March 8th.... go on over to Foxgloves, Fabric and Folly and sign up! Hurry!

3/2/09

Mmm mmm Monday~

Brownies...yum.Here is a super easy/fast recipe for brownies. Grab a box of brownie mix (told you it was easy!) Instead of using the 2/3 cup of oil that the recipe called for on this box, I used applesauce. You cannot even tell the difference--honestly! Anywho, cook according to the box. I used a 13"x9" pan so it took me about 25 minutes to cook.

Once the brownies have cooled completely..... whip up this yummy frosting to add on top. This frosting is more on the "peanutty" side rather than the "sugary" side....so if your needing something sweeter, this isn't the frosting for you.

Peanut Butter Frosting~
1 cup powdered sugar
1 cup peanut butter (crunchy or creamy)
5 Tbs. butter (not the real stuff)
1 tsp.vanilla
mix all that together-- then add up to 1/3 cup of milk depending on how thin or thick you want this frosting to be. NOTE: do not add all the milk at once or you'll end up with a thin/runny frosting.... pour a little milk in at a time so you can control the thinkness of the frosting. I prefer thicker.... so I added only about 1/4 a cup of milk. It made the frosting very thick & fluffy, almost like a meringue. Then just smooth the frosting on top of the cooled brownies in the pan and cut into squares.