Pages


7/31/11

Summer fun...

My two grandkids enjoying their time over at my house riding their scooter. Waving hello to "Papa" as they drive past. This is the area that we are adding the slate to our yard that we bought at a yard sale recently. Look at those natural ringlets.... All to soon these little ones will be driving around in real cars, my-my-my how time does fly~

7/29/11

The Villa

I made this pink flowery sign for my bestest-buddy in the whole wide world who unfortunately for me, is moving to the coast. She stated she needed a sign outside her door to tell everyone her name, unlike me--- I have a "no soliciting" sign :-P.... Here you go sweetie pie, I made this totally with you in mind.... happy, sparkly, joyous, fun, whimsical and beautiful... just like you.Nellrene has been my personal cheer leader for many-many years. You know the type, always upbeat-happy and encouraging you on no matter what... What a true gift she has been to me and my family. She is my total inspiration for being a fabulous Nana! I love you Nellrene, you are and will forever be my bestest-buddy in the whole wide world!! We'll be up to visit you soon, pinky swear.

7/26/11

Metal tag

Having bought 3 rolls of metal tape a long time ago, I sometimes find a need to play with it. I didn't want a huge project, so I made a simple tag. I cut a tag shape out of chipboard to which I simply glued chipboard letters to. While the glue was drying, I used my paper cutter, to cut the metal tape into random size squares. I then just willy-nilly started sticking the metal tape onto the tag covering the tag and chipboard letters completely. I even covered the backside of the tag as well. Next, I burnished the metal tape around each letter being careful not to break through the tape. I used nail polish remover to remove the red logo on the metal tape. Once that was finished, I took a regular ol' pen and started poking holes along each edge of the squares of metal tape giving it the appearance of being riveted together.
Lastly, I painted black paint onto the tag and using a facecloth, rubbed it into the crevices to give it a time worn appearance. I used gray vintage seam binding to finish off the tag. Easy peasy~

7/25/11

Would you tumble for me?

I'd tumble for you!!..... My daughter is trying to win a free party for her two children at our local Swim America & Tumble America club. If you have a face book account and you've got a spare moment... could you pretty please "like" the club at this link: Swim America & Tumble America and then click on the photo section.... once there, click on "cutest kid contest" and of course, my two grandchildren are the cutest there... But.... if your eyes are not what they used to be.... here is some help. This is Chloe only two precious years old...and this happy soul is Jonathan who is four-happy-years old. If you could click on "Like" on both Chloe and Jonathan's photos that'd sure be a huge help in getting to her goal of "WINNING" a party for her two little love bugs. Thank you-thank you-thank you!

7/21/11

Bird tags

I made seven tags for a bird themed swap I joined recently. I made my tags to look like actual bird houses. I think they turned out pretty cute. This is the very first time I have ever been successful using a crackle medium. I had to resort to actually reading the instructions--- and *gasp* following them. What'da know.... it worked. Here is what the backsides of my tags looked like. I also made a bird themed box that I mailed the tags in. I enlarged and printed a copy of a vintage postcard which I then cut out with scalloped scissors. Glitter, crepe paper, flowers, sheet music...
vintage silver doilies and more vintage images adorn the inside....Lastly, I added shredded sheet music and its ready to be mailed. That was fun~

7/18/11

Cloche Party

Welcome to my cloche party! Here we have a shabby chic cloche...The next two I loosely called cloches. This one is made from a lamp. I bought this full of seashells for only $5. I used E6000 glue to adhere the base and the crystal knob at the top. This glass & silver container I picked up for $1 at a yard sale. I couldn't get my money out fast enough...All three of these cloches are on a dresser in a hallway by my front door. Here is a small cloche in my bathroom. I love the look of my cleaned brushes in the blue container in my bathroom, I think they look beautiful! Most times my bathroom sink shows of the colors I've recently been painting with-- I don't care :-P.....The next set of cloches are the ones I made using glass domes and glass knobs and clear beads. This one holds an old-old--- ok, you could probably call it vintage-- photo of me when I was a toddler. The handmade dress had a lot of fabric in the skirt, it looks like a fun dress to twirl in!Here is the largest glass dome I turned into a cloche. It is housing my bronzed baby shoe collection. I just love them!
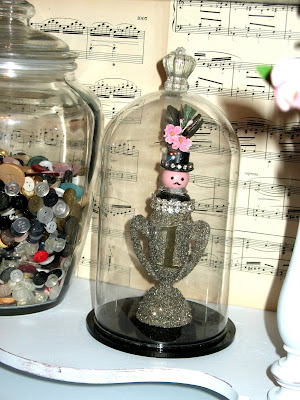
Another cloche I made houses my trophy I won for first prize in a top hat party I joined. Here is another one I made, this one I stuffed full of antique photo frames. I bought five of these for $20. Here are some cloches that I made using some chicken wire. After shaping them, I spray painted them with copper colored spray paint, then I used green embossing ink and powders to make it appear to have an old patina. Here is two more way up high on a shelf....This tiny little masterpiece I picked up for $1. It is made out of a small chickens egg.Here is a close-up of the inside of the egg. Thanks for stopping in for a visit, if you'd like to view other cloches please head on over to "A Stroll Thru Life" linky cloche party.

7/14/11

My Studio 2011

Well its that time of the year again when we all swing open the doors and share our studio spaces. My studio is packed from the floor- to literally the ceiling, come on in and have a poke around. There are two slideshows at the end of this post that show every angle of my studio :-0.... eek, probably showing off some dust too!!!
Here is my table/workspace in the foreground of this picture. It is never this clean-- in fact, I totally took everything off of it for this photo. Its a long-long table that sits in the center of the room, this temporary workspace I've now been using for about 3 years. I have a vintage bookcase on top of my worktable which has several spinning caddies of tools that I use everyday. Scissors, paintbrushes, pens etc.. There is a closet behind those curtains.
I have one comfy chair in my studio that I sit at to jot down ideas and work on small projects while watching t.v.Here is a bookcase which holds very old books ranging from the late 1700's thur the 1920's. Most of these books ranged in price from .25cents to $1. The jars on top are full of my mother of pearl buttons that I collect ;-)
Here are two slideshows showing my studio space in its entirety.... you can stop the slideshow and view each one as a snapshot if you'd like.
Artsy Fartsy Studio 2011 Part 1

Artsy Fartsy Studio 2011 Part 2

Next year I am hoping to have my workspace updated along with addressing the wall where my t.v. is now. I would love-LOVE a wall-to-wall unit over there too! If you'd like to see more spaces of where bloggers create, please visit Karen at "My Desert Cottage" Thanks for stopping by :-)

7/13/11

Inspiration board...

Or should I say "Inspiration bored"... I seem to get a lot of things done when I feel bored! I took a bulletin board that my husband picked up at a yard sale for $1--- he never got around to using it, so I took it. Here you can partially see what the before of the bulletin board looked like. Of course, being that I can never leave anything alone. I used some Mod Podge and glued some vintage sheet music to cover the black frame. I distressed the paper with some ink pads.Then I stapled two layers of muslin fabric to cover the blueish/gray fabric....Then I glued some vintage dresden trim to cover the fabrics edge and the staples. (this is part of my dresden stash that I picked up for only $3!!)Next I glued and used thumb tacks to hold some ribbon in place so I can tuck some photos onto the board.... All finished and hung in place! (those jars are full of mother of pearl buttons!)
Taaaaaaaa daaaaaaaaaaa inspiration board completed!
Now, I've got to find things to inspire me ;-P

7/11/11

Cloches

Did you know there is a cloche party this month? *gasp* I'm always the last to know! I love cloches. Little micro vignettes totally protected by a glass dust covering..... sweet. I have one glass cloche. I know, I know..... so whats a girl to do right? Why make some of course. I don't know about you, but I come across these glass domes all the time. I see at least 4 a month, and they are always under $2. I've had these three in my stash for about 2 years. Finally I'm motivated to do something with them! A little windex to clean them up a bit.... A smidge of E6000 glue, glass knobs, and several clear round faceted beads to cover the hole at the top each glass knob. Taaaa daaaaaaa 3 cloches ready for a party~