Here is a little Easter tree that I picked up second hand for $3 bucks. It came with a lot of really cute wooden ornaments--- the tree was a tangled mess of branches and ornaments. I thought this would be a great tree for my two year old grandson to play with.... but those spiral brances and the long thread hangers on the ornaments were not a good combination for a toddler. Here is the
before photo~
.jpg)
Sooooooooooooo I fixed it.... here is the
after photo of the same Easter tree.
.jpg)
Here is how I did it if anyone is interested :-)
I took a good look at the tree and decided it needed more branches for starters...and a better/simpler way of attaching the ornaments. I cut off the excess wire on each existing branch and then I used my pilers to bend the remaining wire into little circles. This really streamlined the tree into a better shape.
.jpg)
I then started adding more branches to the tree. I used the heaviest wire I had in my "wire stash" and simply attached some of the previously cut off wire from the tree that I formed into straight bits with loops at the end. I used regular masking tape that I cut into lengths of about 3 to 4 inches and then I cut those in half length wise.
.jpg)
This worked out really well! I then used the thin pieces of tape to attach the brances to the tree trunk.... then I used a wide piece of tape over that to secure it completely. Easy-peasy~
.jpg)
Now that the tree was a little fuller and the loops were all in place. I decided that the whole thing needed to be painted. What color to paint it was the hardest part of this whole make-over..... paint it a pastel color?? paint it brown like a tree?? I figured brown would hold up better to little grubby hands-- and would be easier to touch up if need be in the future.
.jpg)
After the tree had been painted I made a box out of foam core that fit snuggly into this cute little metal container. I didn't want to commit to having this tree in this container permanently, so this was the next best thing.
.jpg)
I went over each inside seam of the foam core box with some additional hot glue to seal the box really well because the next step was to add some plaster of paris to secure the Easter tree base inside the foam core box. I added some scraps of foam core to raise up the tree's base.
.jpg)
Then I mixed some plaster of paris and poured it around the base that was pearched inside the foam core box.
.jpg)
While the tree base was setting up I turned my attention to the ornaments. I pulled out the strings in each ornament and went to work drilling a hole into each one...
.jpg)
The drilling was pretty easy...I wore a glove on my hand holding the tiny ornaments
just in case I slipped with the drill.
.jpg)
Then I pulled out of my "wire stash" some Christmas ornament hooks. (I always pick those up at the after Christmas sales, they are perfect when your needing just a "little bit" of wire) Anywho, I cut each wire into two pieces, curled up one end to make a "hook" and glued the straight bit (obviously) into each tiny hole (that I had previously drilled) using E6000 glue.
.jpg)
Next, I cut some leaves out of felt...I just randomly cut shapes while watching/listening to the t.v.......and then just used hot glue to attach them to the tree and also to the ornaments. I then turned my attention back to the tree. To the top of the tree to be exact. I pulled down the two wires I left on top of the tree and bent them down and up and attached...
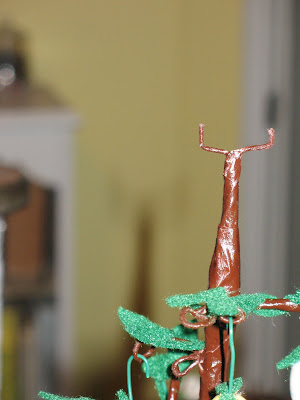
a small birds nest to the tippy-top. I then glued some green leaves around the base of the birds nest just to pull it all together~ I didn't glue the bird into the nest. Who knows, my 2 year old grandson might like a car in that nest! lol
.jpg)
To cover up the plaster in the base, I cut a piece of yellow felt to cover the stark white plaster. I then filled in the top of the container with some yellow paper shredding. I used paper because I have 3 indoor cats that are eventually going to nibble this I'm sure!

Here is the newly revamped Easter tree waiting to be played with.
.jpg)
Taaaaaaaaa daaaaaaaaaa instant caute!!
.jpg) Wait....what the heck is going on here?
Wait....what the heck is going on here? MAMA....get my brother Jonathan away from meeeeeeeeeeeeee~
 Jonathan always wants to snuggle with Chloe...and every time she cries!


.jpg) Banana Crumb Muffins~
Banana Crumb Muffins~ These are REALLY good. I make them ALL the time-- everyone LOVES them!
 And here it is after~
.jpg) It will evolve as I come across more things to place in the wagon. I am not loving the bird cage-- so it might have to be moved. I need to add more of the dark green moss and some more rocks, feathers and other fun things. Like everything else, it is a work in progress! It seems every other year I use it as a planter.... this year its all about filling it with garden things~
It will evolve as I come across more things to place in the wagon. I am not loving the bird cage-- so it might have to be moved. I need to add more of the dark green moss and some more rocks, feathers and other fun things. Like everything else, it is a work in progress! It seems every other year I use it as a planter.... this year its all about filling it with garden things~ I would like a beautiful plate to place this on, but for now I am using a woven plate to keep the moss off of the tablecloth. All of the things were from different thrift stores bought at different times...the nest, flowers, the eggs even the cloche. It isn't as grand as I thought it would be...so I'm on the lookout for something cuter as the tables center piece :-)
 and here he is telling me again only louder and pointing with two pointy fingers "BIG TRUCK" just incase I missed the ginormous trucks with deafing sounds racing around the indoor arena!
 Lastly, a photo with his little ear muffs on to help drown out the loud sounds of those huge powerful engines. Yeah... he wore them for about two seconds~
  This kid LOVES his cars & trucks....on the drive home he was commenting on the other vehicles saying: "big truck"...thats a car, thats a red car, thats a truck and laughing with joy.... he totally cracks me up~ Here is a little video of what we saw!
.jpg) I've had this little bike sitting amongst some plants in my flower bed for awhile..... I found the wicker bicycle basket for a dollar and the flowers were given to me by another friend...taaaaaa daaaaa instant caute!
I've had this little bike sitting amongst some plants in my flower bed for awhile..... I found the wicker bicycle basket for a dollar and the flowers were given to me by another friend...taaaaaa daaaaa instant caute!.jpg) It really is darling. It looks as though a small child stepped off of it hiding it amongst the plants saving it just for them so no one else would get it.... and they never came back for it...and there it sat for years and years....waiting~
It really is darling. It looks as though a small child stepped off of it hiding it amongst the plants saving it just for them so no one else would get it.... and they never came back for it...and there it sat for years and years....waiting~
