Pages


8/30/15

Mermaid Statue

I bought a resin mermaid statue recently from our local swap meet. Here she is after I painted her... I have been wanting a mermaid for my backyard, and with a lot of little kids about--- it is important that I have a "modest mermaid." You'd be surprised at how many well endowed/nude mermaids I've had to pass up! The tip of the seashell she is holding was broken off. That didn't discourage me from buying it-- in fact, it made it cheaper. *wink* For me, I knew it was an easy fix. I grabbed my favorite, Fix-it-all. It is a really great product that I find super easy to use. Here you can see the repair I made using the patch. It comes in a powder form and you add water to create the consistency you'd like to use. I always mix it up to form a type of clay. It is very much like using paper clay in my opinion.
Once the patch job on the sea shell had dried I began to paint the mermaid. I didn't take a before photo, I was in so much of a hurry to jump into the fun task of painting! The mermaid was the color you see in the previous photos. I used metallic green paints to paint the mermaids skin and tail. For the seashell, I used muted colors so the shell would look as real as possible. I did the paint on the mermaid in layers. This is the first layer before I sprayed it with a clear gloss sealer.

 The next coat was a black wash over the mermaids scales and body. With the previous paint sealed it made it a breeze to do a wash of color over the existing paint without so much as a smudge.
For the mermaids hair I started with black paint and then used different dark colors that I imagined would be in the oceans water to make her hair a little more interesting. I guess you can't do anything wrong with painting a mermaid... since you don't have one to compare it too. Next, I sealed the newest painting I did and began the last layer. I used some shimmering glitter gloss paint to her tail and added some small rhinestones around the scales at her waist and a few on her tail and then some more at the tails tip. One last coat of clear sealer to finish her up. I have plans of putting her in a cage filled with sea shells.... but for now she is just on a shelf.
I've also been working on putting up some outdoor lights in my backyard that tie into the overall theme of my yard. I purchased seven wrought iron lights for the crazy low sum of $20.00. I did have to take the glass out of each one and spray paint them, but that was an easy fix. We had to create a wooden hanging post for each light to hang from... here you can see the two we have started with. The lights have not been wired yet, but in the near future I see it coming together! I'll add some more rope at the top where the lights hang from--- I'm not to thrilled with the rope at the bottom... but from close-up nothing looks good. That's my story and I'm sticking to it.
 I also wanted some mood lighting on the side of my house. This area called for a softer light source. I bought some round wooden tree supports and cut them so that they would only stand six feet high when placed in the ground. I spaced them eight feet apart and I am going to string outdoor cafe lights from the tops of each pole stringing them all together.
 I have also been working on making some outdoor games. Here is a pirate themed ring toss game I've made... It is still needing a little bit more work, but the majority of it is finished.
 
At the top of the ring toss game I have a deer antler, a pulley/hook and a silver candle sconce.

In the middle I have an old pirates cup, a sword handle and a ships cleat... and the extra space is reserved for a hook from some unfortunate pirate who has lost his hand...

at the bottom of this new game... a jaw bone from possibly a cow? and a skull and cross bones.
 I have sooooooooooooo many projects that are in different stages of completion.... and that is just the way I like it.
big hugs,
 

8/18/15

Wire Wrapping Classes

With the new school season starting up, it had me itching to get back to school too! Well, not "school-school" that'd be bore--- ing. But wire wrapping classes! *woot-woot* I have been admiring a lot of beautifully wire wrapped cabochons online lately. Of course with my "I can do that" attitude, I signed up immediately! I wanted to jump in feet first into some huge elaborate project with swirling wire around a beautiful stone--- didn't quite work out like that. No, I started by making a ruler. A wire gauge ruler... but a ruler none the less. At least I was lucky to get a one on one lesson from a person who is very good at wire work, so I figured it would benefit me in the long run...*sigh* but a ruler? okokok... now that I finished that project, I admit, I do see now how beneficial it will be to me later... It is a lovely ruler if I do say so myself~

As my friends can attest, when I get into something... I am all in. I bought the tools, the wire and several different totes to carry it all. (I still haven't found one cute and large enough to suit my needs- yet) I have been to three classes so far and haven't made anything in the classes other than friends! (and the ruler) That being said, I have watched-- listened and yes, learned. Who knew? Right? The instructor passed out written directions to a bracelet everyone was working on. I took it home and created one of the links to the bracelet. Shown below with the yellow round stone. I only made one because I wasn't to keen on the design. I also glued some tiny polished rocks to an old cross that had previously been in a "scrap pile." I'll stick a dollar price tag on it and it will sell quickly. *wink*
With my feet wet, I decided to create some more on my own. I decided to create some free form wire wrapped stones. I figured there is no right or wrong way to do that. Right?... so I just winged it. I have a lot of polished rocks in my yard, so I rooted through them to pull out some small ones to play with. I managed to come up with a small bowl full~
Here are a few free formed wire wrapped stones I have made... so far. Here are the quartz crystals....
These ones below are a few of the rocks I had gathered from my backyard. The light gray one is a beach stone. 

Some more of the rocks I had in my back yard collection. I added some jewelry quality rhinestones to some of the swirls. Once I was finished with that, I had an idea to create tiny seed bead wire trees to hang on a necklace. I have a collection of over 20 large wire trees and the idea of making a tiny one to hang on a necklace sounded like a good idea. They are not really all that time consuming and even though I'm just winging it, I think they turned out pretty darn cute. I used small rocks on two of them and a glass cabochon on one.

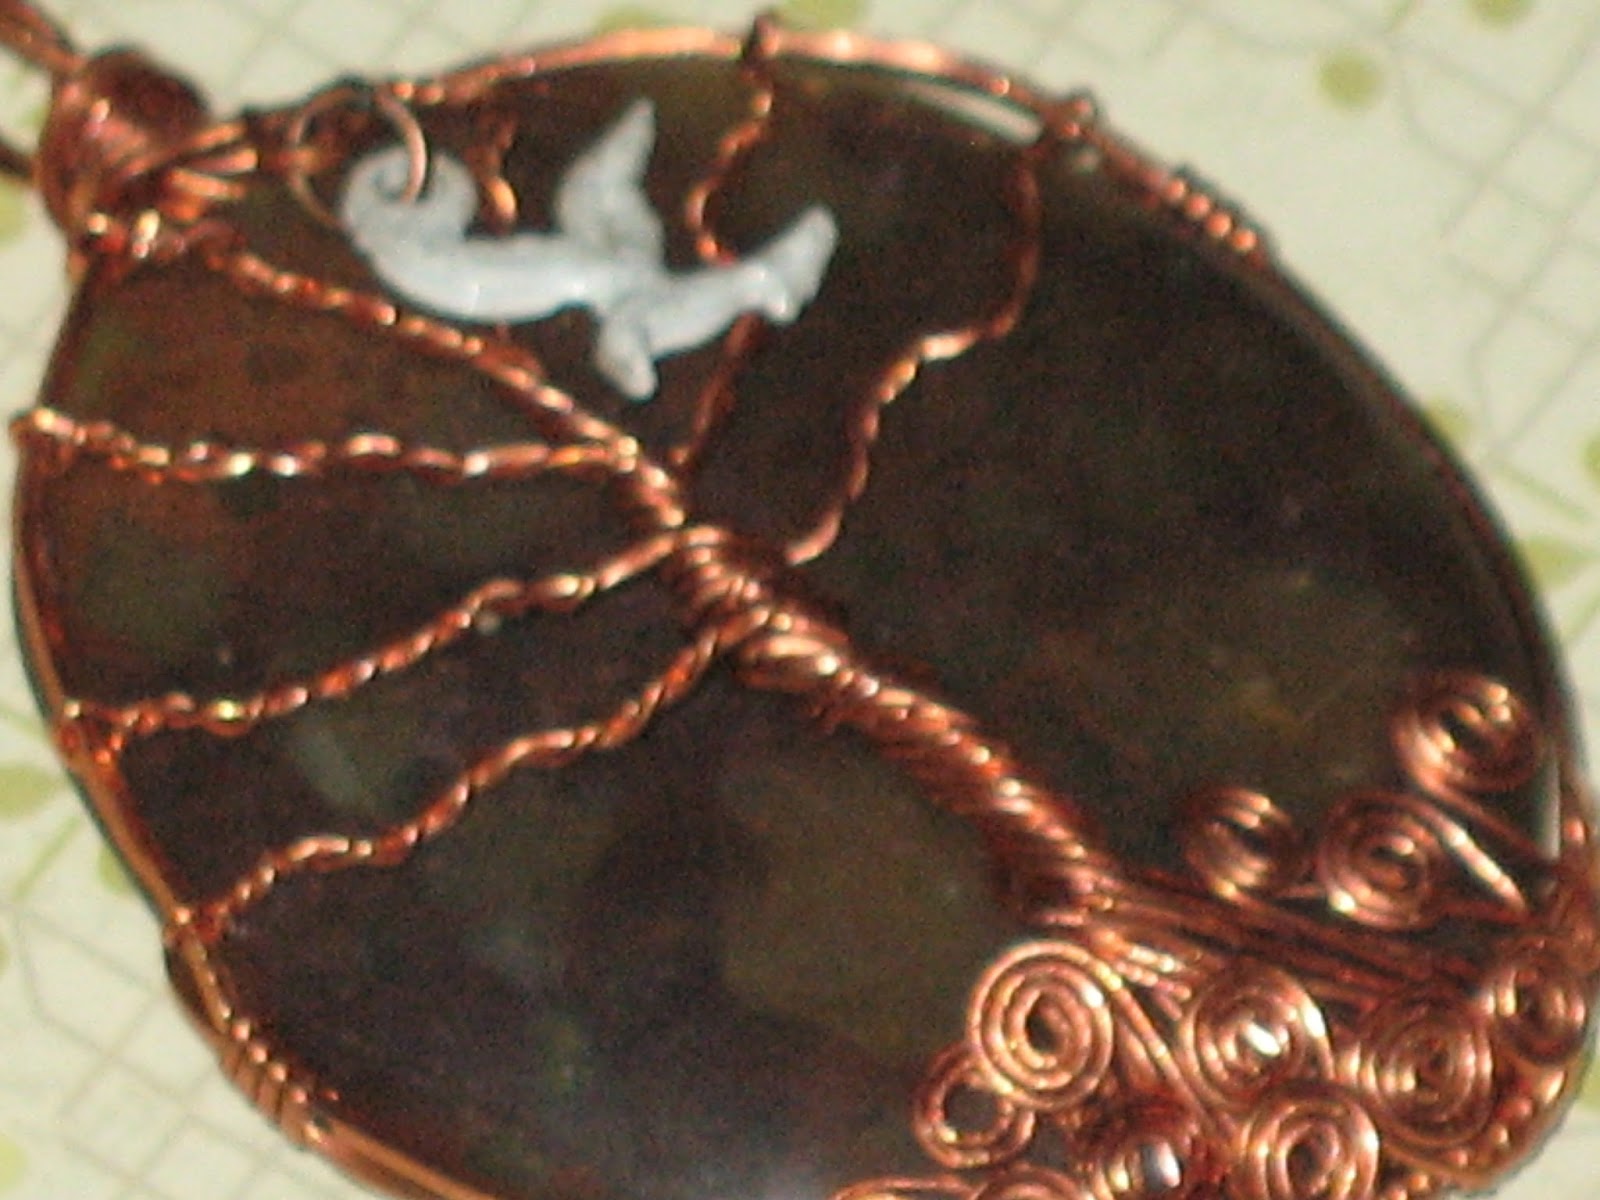
The "Tree of Life" is very popular. So, I made some of those too.
Here is a close up of the smaller of the two. It is not a perfect cabochon, it is just a flat polished rock. The rock is not perfectly balanced in its shape, but I think it looks pretty good considering I did this on my own. I added a tiny seagull charm to this one.

Watching the skilled artisans making beauty out of wire inspired me to give it a try myself. I created these two totally on my own... gasp.. unsupervised! The blue stone isn't a perfect cabochon. It has many different angled sides and it is faceted along the edge on both the top and the bottom of the stone. I like a challenge and wrapping this stone certainly was. 
I will take these into my next class so I can get some feed back on how I did. I know I am needing the basics to build upon. I admit it. BUT, once I get the basics, I'm going to be off and running! 

Along with the wire wrapping class, I am also taking Lapidary classes where I am going to be learning how to cut, polish and engrave stones. I have a lot of rock slabs that I have been buying over the years from estate sales, yard sales and the swap meet. I can cut all of those into cabochons to then use in the wire weaving class.
Like that isn't enough on my plate, I have also been taking Silversmithing classes as well. I am in the process of creating a silver ring with a bezel that will hold a small cabochon stone. I have always wanted to learn how to use a torch and solder metals. For now, the torch and all of the highly flammable liquids near by kinda scare the bee-gee-bees out of me, but I have a great teacher who assures me I most likely won't make anything blow up. So, I have that going for me. *wink*

There are many more classes that I am interested in taking as well. I will be taking the faceting classes and the lost wax casting classes too and any other classes that come up!
big hugs,


8/5/15

Back Yaaarrrggghhd

I have been reworking some of the areas in my backyard recently. I decided to move the pirate ship cabin off of the cement pad and put it in the lagoon area. I had to cut down a tree and pull up some plants to make room for it... happily it fit... whew. Here is the view when you are at the top of the stairs looking down into the lagoon area...

 The view looking up the stairs from the bottom of the lagoon area...

I have never fully loaded the top of the pirate ship before... but now that it is in this new area, it just called for more detail in its staging. Of course, it just wouldn't look right without a cat in the picture right? Here is Puss-puss in her new favorite spot. 
I had this wooden chest sitting on top of the pirate ship for about four years. It just needed a fresh coat of paint and now it is going to be a focal piece filled with treasure and pirate loot...
The backside of the pirate ship is facing the wooden deck area which is the area where we play a lot of games. So, the backside of the pirate ship needed to be tricked out too.
The underside/back of the boat is open and instead of closing it in, I decided to use it to showcase some pirate loot.
There is a lot of things in this small space, which isn't readily visible unless your bent over peering into the space--- but just in-case someone does that--- it will look fabulous.

Out of everything I have done recently, this spot is my favorite... I love how the striped pennant looks draped from the ships mast across/through the plant. It is the little things isn't it?

Looking down below the pennant is a golden Buddha statue with coins tossed at its base.... for wishes I imagine. Pirates need a lot of luck. 
Tomorrow I will be out in the yard bright and early trying to get things moved and organized before tackling another new project.

A big thank you to those who sent their love my way over the loss of my sweet cat Chumley. Your kindness was heart felt.
big hugs,

7/31/15

Chumley

My sweet ol' hobo kitty Chumley passed away on Monday. *sigh*  Here is an old photo of Chumley taking a nap on top of a pirate chest in my backyard. He was a perfect pirate kitty...
Chumley wandered into our yard one wintery day and took up residence in the bushes. For weeks I tried coaxing him out with tuna, turkey, and wet cat food. He wasn't falling for it, and would wait patiently until I set down the food and walked away before he would come out to eat. One night I was sitting on the front steps enjoying the night breeze and Chumley snuck up and rubbed his face on my hand-- scaring the heck out of me because I didn't see him coming. Of course that little gesture of his.... gave me complete permission to scoop him up and love on him! From that day forward he would never shy away from being touched again...
Chumley was a skinny, malnourished boy when I came across him. He was missing one of his fangs... and you could just tell life had been hard on him. Many a time, I would catch him looking around to see if he was alone... tilt his head to look up to the sky and then start these long mournful, howling-meows. It resembled a dog howling, only Chumley would be meowing at the top of his lungs.
As a small remembrance of my little hobo kitty, Chumley, I made a statue of him. Chumley wasn't a soft, smushy kitty. Chumley was more of a rigged, no-nonsense cat. I assume because of his advanced age and rough life that he was this way, I'm not sure. Although, with that said, I could easily turn him into a drooling, foolishly happy beast none the less just by petting him and showing him affection...  
 I added the word "Meow" to the statue.... His howling meow's will forever be a sweet-sweet happy memory.
I was lucky to have loved him for the time he had left. My precious hobo kitty... Chum. *sniffle*
big hugs,
 

7/22/15

Minion Movie

Last night I went to see the new Minion movie with my daughter and my two grand kids... I thought Minion hats were in order!
Here is the one eyed little guy, he is my favorite....
 and the other one I made.
Here is my grand daughter Chloe wearing one of the Minion hats.

My grand son Jonathan is a good sport and at least put on his Minion hat for a photo.
 They told me they both wanted to sit by me, so I got to sit in between them last night... made for one happy Nana :-)
big hugs,

7/20/15

Day of the Dead Necklaces

It has been awhile since I've created any new spoon pendants.... I felt it was time to get back to it.
 I have a few new venues that I am going to be selling at this upcoming year and I felt I needed to go in a slightly different direction for those events. I love the images of the highly decorated skulls of the "Day of the Dead" so that is what I used. 
I created these using much smaller spoons. These are surprisingly much smaller than a teaspoon.
 I think I like the itsy-bitsy  spoons over the larger spoon pendants. I have a lot more of these spoons all ready to be decorated... which probably means I'll crank out another large batch in between...working in my yard, crocheting, playing with metal tape, etc, etc, etc... you get the idea *wink*
I like the idea of having a little shrine to remember a special someone who has passed on... although, I don't need one to remember my best friend who passed away... I do that automatically- daily... I think I'll make myself a special pendant just the same, in remembrance of her.
big hugs,

7/8/15

Recycled T-Shirt Bags


I try to have some sort of fun craft for my grand kids to do when they come over for the day during summer vacation. You know how boring summer vacation can be. Summer vacation sounds so fabulous on the last day of school... but a couple of weeks into it, your so over it... Luckily,  Pinterest came to the rescue. I have a board on Pinterest called  "Summer Time"  One of the cute ideas that I had pinned was to make a bag out of an old t-shirt. I had my daughter bring over some of my grand-kids old t-shirts they had outgrown to use in making their bags.

The majority of the work was done by me...  Basically I had them nearly completed but for a few cuts to be done by the kids. These t-shirt bags have a bottom sewn seam. So, I first  turned each t-shirt inside out and pinned the bottom of the t-shirt making sure it was smooth, then I just hemmed along the bottom, easy peasy. Of course, I had to go a step beyond just the basic straight stitch across the bottom of the bag and gave each one a "boxed bottom." The boxed bottom will make it easier to hold wider things and it just gives each bag a better overall appearance.

Next, I flipped each shirt right side out laying them as flat and smooth as possible. I made some cardboard templates to use as marking guides for cutting the shirts since I was going to be marking a lot of them at one time. I pre-made a stack of shirts ready to be cut into bags, all the kids had to do was cut on the chalked lines to complete them. I placed pins very close together so that the two layers of each shirt wouldn't slide around while the kids were cutting the fabric.
It worked out pretty well...

It was nice for them to have immediately accomplished a task and get rewarded with a finished product so quickly... I wish I had someone to pre-make something for me so I could swoop in last minute and finish it up!
The t-shirt bag for my grand daughter just screamed for fringe. For this bag, I didn't turn the shirt inside out before stitching the bottom hem. I stitched across the bottom front and then fringed the remaining fabric of the shirt. The pink cutting line is chalk and will wash away.
I had my grand daughter add some beads to each piece of fringe along the front and back of the newly made bag. Each bead was slipped onto the fabric and held in place by an overhand knot. Easy-peasy.
Of course, Nana needed some recycled t-shirt bags too, why not.... I used two Ed Hardy t-shirts that are heavily-rhinestoned for my two bags. This Nana rocks the rhinestones *wink*
Well that was fun... When is the first day of school? *wink*
big hugs,