Pages


4/7/20

Face Mask Pattern

I've been spending my days making face masks for my husbands coworkers who work at our local hospital. These masks are not for them to wear at work but for them and their spouses to wear when they are out in society running essential errands. I'm giving these masks to them to wear as "gentle reminders" to keep a safe distance from others. They are not hospital grade masks.... so keep that in mind.
At first I was concerned that I wouldn't have any elastic at home knowing all the elastic in town is sold out. I don't know why I was worried, if you know anything about me, you know I like to buy things in bulk. I've got a full spool of elastic and a full spool of twill tie as well. Plus a jar full of white and black thread... and obviously a huge hoard of fabric. *wink*
So, here is how I make my easy peasy face mask.
Firstly, you'll be needing a piece of fabric measuring 9" by 12" I've got a huge stack of fabric cut, I like to buy in bulk-- and I like to make things in bulk too!
Take the rectangle fabric and fold it over so it now measures 9" by 6" Pin the sides together along the 9" side so that there will be an opening to turn the mask inside out when the piece is completely sewn together. I used a 1/4 inch seam allowance.
Next you'll be working along both sides of the mask (the 6" sides) Cut a piece of elastic 7" long. Place the elastic inside the mask and pin each edge to each corner on one side of the mask.

 It will look kinda wonky, but it will lay flat---
when you pin it down. Do this on the other side of the mask as well.

Sew along both sides of the mask using a 1/8 inch seam allowance. Go back and forth over the elastic to make sure it is securely attached. You can use a 1/4 inch seam allowance, but it makes the mask a smidgen smaller, its your call. So here is the mask sewn together. At this point, using the opening in the 9" side turn the mask inside out.
Once it is turned inside out you can see it resembling a face mask.
Iron the mask flat.
Now comes the part in constructing the mask where you'll be creating the pleats. Don't be intimidated, it is easy peasy. If I can explain it well that is! First, figure out which side is going to be the front as opposed to the back, and also, the top from the bottom. If your working with a pattern in the fabric, it should lay with the image/words facing you. Once you've figured all that out, fold the mask in half and iron it creating a nice crisp edge.
Next, open up the mask and take the bottom of the mask and iron the bottom edge up to the line created when you folded it in half previously. Iron that crease in the fabric.
The top edge needs to be folded down to be ironed too--- BUT, the top edge will not be flush with the center mark. It needs to be ironed leaving about 1/4 inch above the center line.
Here is what the backside of the mask looks like. I've highlighted the ironed creases with chalk so hopefully you can see what I was trying to explain. 1.)Fold in half 2.) fold the bottom edge up to the middle 3.) fold the top edge down 1/4 inch above the center line.
Lastly, pulling the fabric together to create the pleats. I'm hopeful I'll explain it well enough for you to understand me-- if you choose to give this mask a try.
Ok... so, the previous photo shows the backside of the mask....so I needed to turn it over to start making the pleats. Each crease you created when folding and ironing the fabric will be the backside of each pleat. First pleat: open up your mask you have what looks like four rows. I like to start with the wider side, the one that folded up to meet the center line. I fold one side completely before going to the other side of the mask.

Hopefully, looking at this next photo will be helpful! This photo is the backside of the mask. See how the chalk lines line up with the fold of each pleat? That is what you want. The ironed crease is pinched, then the fabric is folded onto itself and pinned...

If you take some fabric and just try to copy the above photo-- you'll get it, I promise! So, here is one side pinned and now I've started on the other side of the mask.
Again, here is the pleats from the backside---  the ironed creases will be folded to the back. So, you pinch the fabric and lay it down and pin it.
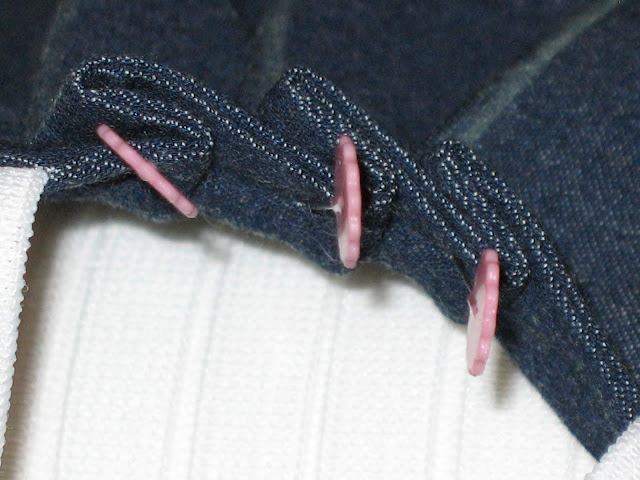
Now, if you've got all that. the last thing you'll be needing to do is sew along the entire outer edge of the mask. I used a 1/8 inch seam allowance. You can use a 1/4 inch seam allowance it wouldn't change the size of the mask at this point, but make sure your catching and closing the opening you've used to turn the mask right side out.

Here is the mask completed.
I like to iron the completed mask super flat... and then iron them in half. This serves two purposes. One, it looks cuter... and two, if by chance someone (even though they shouldn't) rewears the mask, the person will be able to tell which side should be up against their face. These masks should only be worn one time then washed and dried to be worn at another time.
Here is the finished mask popped open.
The mask is surprisingly comfortable to wear.  It does have a gap at the bridge of your nose -- but you can easily tighten that up by adding some double sided tape and adhere it to your face.

One word of advice, don't use super cute/adorable fabric! People stop and talk to you about your mask! Move along people, move along...
Stay safe! Big hugs,
Cheryl

1/13/20

Quartzsite

Last week I went on a little trip with some friends from our local gem and mineral club to Quartzsite, Arizona. It was an eight hour drive from California to Arizona--- but with all the laughter during the drive, it honestly felt like a four hour drive-- how is that possible? I didn't know exactly what to expect, but I knew there were things to buy-- so that gave me some comfort... *wink*
I bought a bunch of rock hearts. I think I'm collecting them now.
 I love Labradorite. Here is a bowl full of it... all 144 pieces! Labradorite has iridescent blues and greens in the stone that shimmers when you move it. This is a super bad photo to show that off, but trust me, it is beautiful :-) Because they are cut and polished for the color to be on top and you are basically seeing the sides of the cabs.
I also bought myself an Amethyst Crystal. My friend bought one..... so... I had to have one too. I couldn't find a nice one and was fortunate to have my friend Eddy find just the perfect one.
 It kinda gets lost in the scheme of things.... so, I think I need to get more and have a "collection." Another trip to Quartzsite is in order!
 I got two bags of broken crystal fragments to use in making wire wrapped pendants. The bigger pieces I'm going to have to whack with a hammer to make more manageable pieces. "Hammer time."
 Once the pieces are the size I'm wanting them to be, I'm going to use a sanding/grinding machine to smooth the edges. I'm going to do the same thing with these Amethyst pieces below. (the flash distorts the color, they are darker in person)
I bought 100 dyed agate slabs for a very reasonable price. I bought the smallest size they were selling, again to make pendants with.
 The next find was a fun one. I kept seeing finished pendants where they had used big blobs of copper... I was smitten! I actually was working my way back to a vendor to buy a finished copper pendant when I spotted a man selling the copper blob pieces. Needless to say, I'm going to be making my own.
 I bought a total of 75...
 The vendor gave me a huge stack of cards describing the copper nuggets so that I can tuck it in with finished pendants.
 These three cabochons are the only other rock cabochons I bought other than the Labradorite. I have no idea what they are, I just liked the shape-- and the price. ($1.00 each)
 I picked up some glass hearts and shapes along with three goldstone Holy Crosses. (goldstone is man made glass) I'm going to pull off the silver bail pieces and wire wrap the hearts.
 I bought three slabs of goldstone to create my own cabochons. I got three slabs of color.... gold, blue and green.
Here is a teardrop shape I am working on, underneath the teardrop is what the goldstone looks like before it has been polished... pretty huh?

 I bought a lot of chip beads to use making some trees of life. A young girl I know is having a baby and that is why I bought all the pink and blue... probably way more that I'm needing!
 Of course when I saw Labradorite in chip beads, I needed to get a bunch of that!
 There were so many beads to choose from and this is all I got... wha-wha-wha......
 I also scored some black showcase boxes. Some are hinged with glass in the lids, a few are just divided spaces in a frame that I'm going to use to separate items in my jewelry drawer. Those three sizes of boxes that you see in the bottom left are to put a piece of jewelry inside of then close the lid and it ends up looking suspended in the center of the frame.
 I also bought some metal specimen stands which I'm going to use as stands for my new jewelry showcase boxes.
The trip was definitely a lot of fun and there was so much to look at and consider buying... I think I did pretty good, no regrets with things I bought and things I didn't buy.
big hugs,
Cheryl


1/1/20

2020

Ah a new year... so much hope for a brighter, happier beginning of all things. I look at each new year like a child looks at Christmas. I make lists of things I want for the new year... I do. I believe in projecting things into being. Sounds weird, but it has always worked for me so I'm not going to change anything this late in the game.

So things I want for the new year... hmmm.... I'm going big this year...
  • A new house.. doesn't hurt to toss that wish into the universe...
  • open my Etsy site again
  • start painting
  • blog more
  • Up my wire weaving skills
  • Volunteer more
  • Participate in a Dia de los Muertos event 
  • Travel more
  • host more parties at my house (or at my new house *wink*)
  •  revamp my studio 
  • so much more!
 This year instead of a "word" for the new year, I'm going with a phrase. Drum roll please......
"You've got to start it to finish it"  

This past year has been very unusual to say the least. I honestly feel like I've sat on my butt all year long doing nothing.... nothing I tell you. Normally, I'm juggling a bazillion and one things, and happily too. So with all that said, I'm going to try to "start" things.... so I can "finish" things... get off my butt and get going. 
With all that said... Bring on the new year!
Big hugs,
Cheryl

12/3/19

Tree of Life

With the new year fast approaching, I've decided I'm going to concentrate on creating a themed set of wire creations for each event I'm going to be selling at. I want to participate next year at the Día de Muertos, which I've wanted to do for years! 2020 I'm going to make it happen! Along with Holy Shrines, I'm going to make skull jewelry, wire trees of life and wire leaves. 
I used a crystal with Amethyst chip beads to create this chunky tree of life.

This tree of life on this crystal I made a little different than the first. I like this style better as it was less fiddly. The bail is hidden in the back.
I got a strand of dyed crystals from our local hobby store. They have a side drilled hole at the top which I might consider using in the future for a different take on this pattern.

I created a traditional tree of life using a circle. This very basic shape was going to be a center of a more elaborate piece, but it ended up being to heavy looking for what I was trying to achieve.
Here is the piece I ended up making with the smaller/finer tree of life for the center.
I made some trees on some thin agate slabs too...
These all have a wire frame in the back that I've attached the wires to.

I actually like making the bare trees better than the ones with the chip beads. I'll continue to make both as I hone my skills to get better at making them.

I entered my wire jewelry at our local fair. This case below was entered as a "display" case and so it didn't get to be judged. Everything I made for this case was pirate themed...
 I was going to heavily "pirate" it up with netting, gold coins etc--- but time got away from me so it ended up being a very basic case. Cute, but plain in my opinion *wink*
 My competition case took first place. *woot-woot* I do play to win!
 The only down side to winning first place two years in a row... you don't get to compete any more... because... You're. Just. To. Good. My words not theirs lol ....
 Next year I will have to enter "wire wrapping" instead of wire weaving in order to compete.... nuts, I don't like wrapping wire. In the photo below you can see two single entries that I got ribbons in. Wire weaving, first place. Wire wrapping (bracelet) second place... wrapping is so boring. I've got a year to come up with some eye catching designs to garner a blue ribbon!
There was even a category for rock painting. I painted Jack Sparrow on a rock slab. This entry got first place. *big grin* I am not a painter by any stretch of the imagination... but I can fake it pretty well!
big hugs,
Cheryl