Pages


12/5/18

An upcoming Pirate Event

Next year at our local fair I am going to be doing the decor in the super large building that houses our Gem and Mineral club. Being the Event Planner with the theme of "PIRATES".... it's going to be epic. At least that is my plan. *wink* So of course, with the event fast approaching (10 months away) I've started working on props already.... I was fortunate enough to get a LOT of things from our local dollar store after Halloween for .25¢ each. Yep, three shopping carts full. (I should have gotten even more!) It really does pay to ask for price reductions and plead your case/cause! I bought a lot of these Styrofoam skulls. I've never been a big fan of them, I'll let this photo below show you what I mean. 
 With most things, I can see the potential! Especially for .25¢ each.
 It was an easy makeover, I pulled off each skull cap, painted the skulls white and then distressed each with black and brown paint.
 I pulled apart some thick twine to use for the strands of hair, lightly tacking it on with hot glue. Then replaced the skull cap, added a little moss... and ta~da... pirate skulls!
 I've been having my husband bring home boxes that paper gets delivered in. I pulled the boxes apart and re-glued them back together inside out so that I could take advantage of the brown of the box itself and then I just distressed the edges with a quick spray of black paint and of course the all important "RUM" stenciled on the outside.
 These boxes serve two purposes...
1.) to store things inside of for the next 10 months
2.) to use as a prop during the event.

I had to spend a few days dragging all of the pirate stuff I'd bought into my garage to get ready for Christmas! I'm hoping to find a nice balance so I don't get overwhelmed. To late. *wink*
big hugs,
Cheryl

11/12/18

Local Fair

I entered a few wire wrapped pieces into our local fair this year. Ientered as a beginner. I got first place on everything I entered! Here is my case of twelve pieces that got a "first place ribbon."
 Here is a close up of the left side of the case.... and the right side...

I used vintage photo mats with burlap to showcase my pieces. I was told not to do anything "tricky" because the judges don't like any extra "fluff" taking away from the pieces. I was confident that it added to the case instead of distracting from the pieces... but was warned that it might lose me some points. Happily, it didn't.
I had wire wrapped this hanging nest with fresh water pearls as eggs and was at a loss as how to show it off. The cardboard photo frames were not cutting it. Luckily, I had an antique photo case that worked out perfectly. 

I also entered two solo pieces. One under the category of "wire weaving." I made the chain too...
This one in the category of wire wrapping. I made this chain too. I was told that the labels describing the pieces were going to be judged as well. I thought for sure that is what would get me marked down on for sure because I don't know the names of any of these rocks! So, what did I do? I simply put down "cabochon." It worked, whew.
I was happy to take first place in every category. I do play to win! It cost me $6.00 to enter and I won a total of $60.00...and the bragging rights-- which are everything~
I've already got a few outrageous ideas of some things I'm going to enter into next years competition. My goal is BEST IN SHOW.... oh yea baby... Best. In. Show.
*wink*
big hugs,
Cheryl

10/9/18

Quilty Cats

Last year I had made a bunch of stuffed cats using an old quilt from the 1930's. Surprisingly, they all sold and I'm getting requests for more. Who knew? I recently went to an Estate sale where I found some fun-funky quilt toppers from the 1970's. I've got a large stack cut and ready for button eyes, embroidered mouths and then a pink felt nose and of course whiskers.
 Makes you want to say things like "Right on....
 "Cool"....
 "Jive turkey"...
 "Groovy"....
I had a few quilty cats left over from last year that I hadn't finished... those will be completed and added to this years "litter" of adoptables. I even made some cats using vintage chenille bedspreads.
 I also had an all white, hand stitched quilt that was a "cutter quilt"... the all white kitties are my Christmas kitties and they will be sporting a Christmas bow.
 I think I've managed to get 60 Quilty cats finished....
 I've got three bins already loaded up and ready to go...
I  still have a stack of quilty cats to finish.... the thrill of making them is fading fast! I may end up with another stack to finish at a later date!
big hugs,
Cheryl

9/17/18

Cabochons

Last weekend, I was lucky to come across a large stash of cabochons.
It seems all the ones I've been finding lately are the colors of mud...
So, I was delighted to see so many different colors in this lot.
It isn't like I need any more cabochons... I've got a bazillion I have yet to wire wrap.
If I were to make these myself it would take me at least an hour to create each one...
The large pile of polished rocks cost me $2.00 and the cabs? Those were .50¢ each.
I couldn't/wouldn't pass them up at that price!
big hugs,
Cheryl

9/1/18

Relay For Life

I was asked by some friends of mine to create a dragon out of a (new) needle sharps container to be used to collect money for Cancer research for Relay for Life. Without hesitation, I said I'd give it a go... 
 Here is the picture with a drawing of the dragon I was to create....
 I asked for a little more detail and got this....
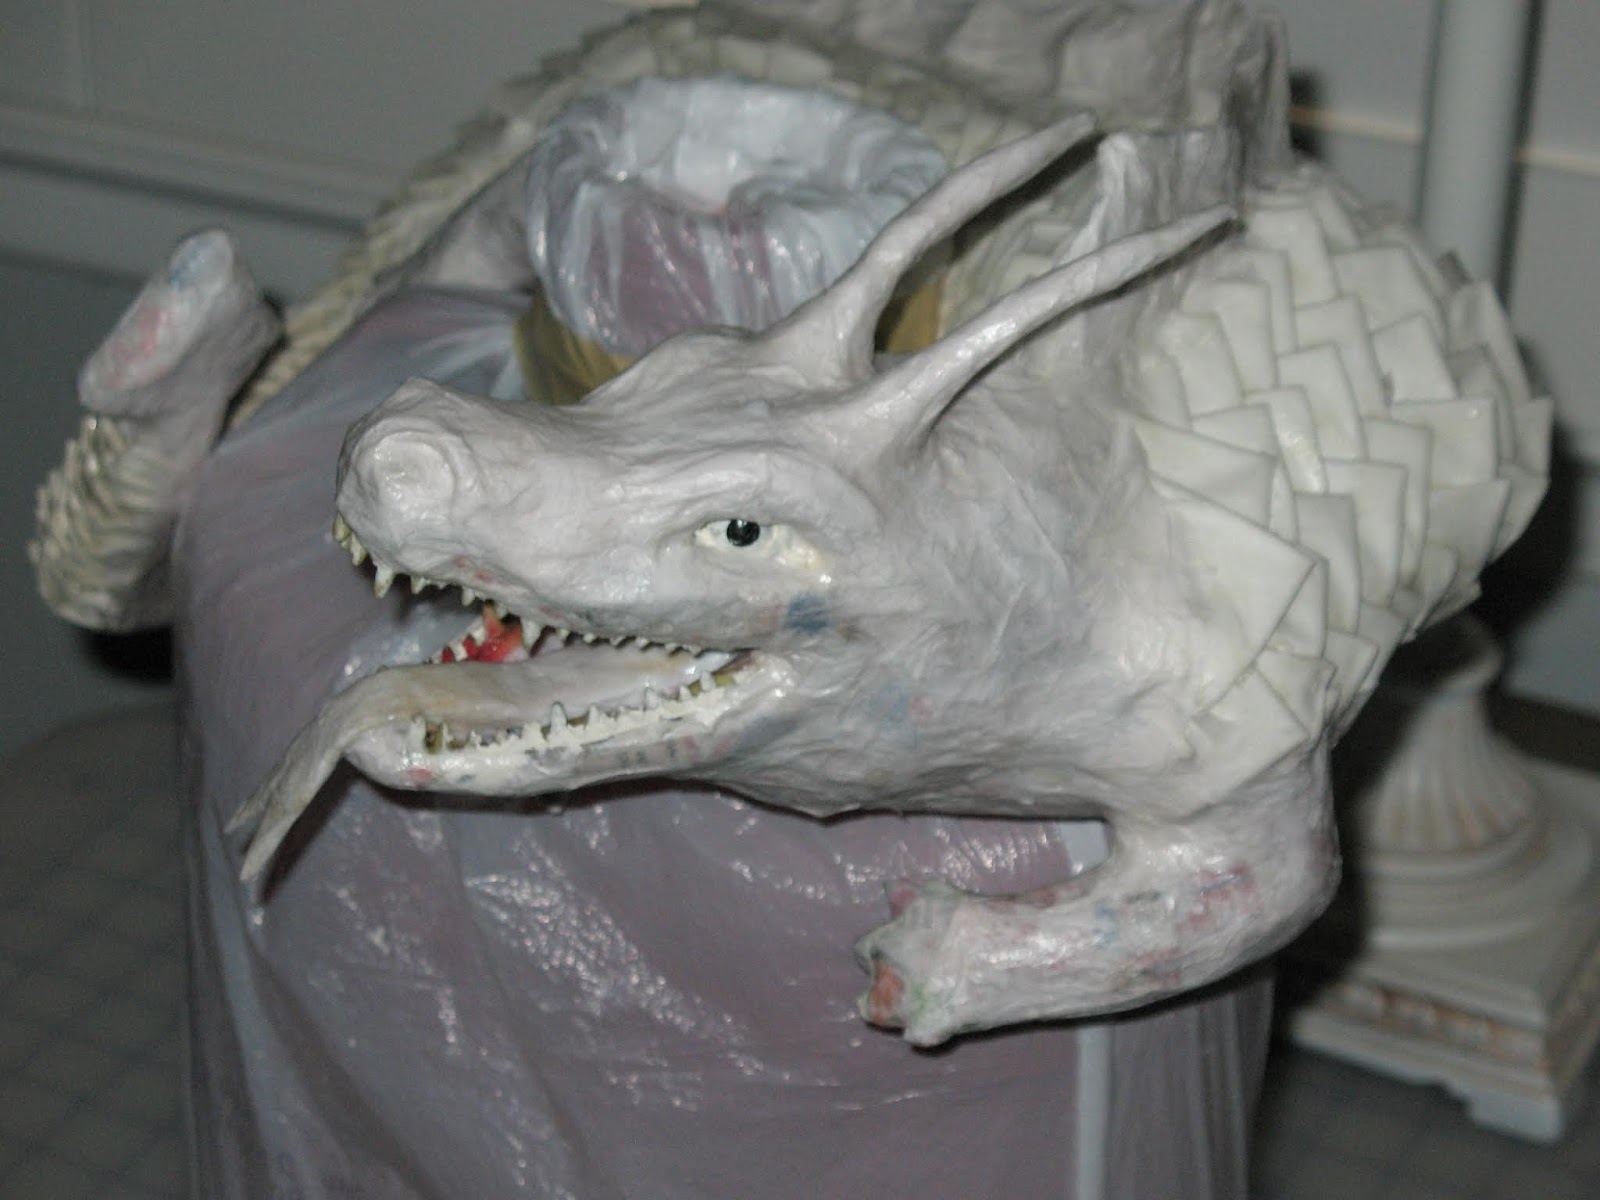
With the two drawings in hand... I figured they would be happy with whatever I came up with! My first thought was to make a large dragon using the container itself, but thought better of that seeing how it would have to be massive. I decided to come up with a little baby dragon that is wrapped around the container itself.
I began by making a paper mache base, then used fabric to create the scales/skin of the dragon. I draped paper mache coated fabric along the spine of the dragon, and then began adding scales one at a time starting with the tail...
That ended up being very, very time consuming.... so I had to rethink how to do the scales.
I decided to try hot gluing the fabric scales directly onto the dragon form without dipping each one in paper mache first. That seemed to speed things up! Once the scales were in place I coated the fabric with a lot of Modge Podge to give it some "tooth" to hold its shape.

I also added some scrunched up tissue paper over the original paper mache newspaper body.
I really love the look tissue paper gives things, I guess that is why I always try to incorporate it into something I'm working on. Once the body was finished, all it needed was paint. I used a lot of different colors...
Lots of layers of paint...
 In person the paint colors work, the flash of my camera really makes this little baby dragon look deranged!
 I created this dragon to either wrap itself around the sharps container,
Or playfully climb up the container when it is laying on its side. I think it looks a little friendlier this way *wink*
I do think I "nailed it!"  The similarities are striking! lol....
I'm still laughing...
 big hugs,
Cheryl

8/16/18

Lanyards

I've been keeping rather busy sewing up some fabric lanyards recently. I have a LOT of fabric that I have no idea what to make with it all, so I thought just cutting long strips of it and playing around making lanyards was in order. I searched online to find a good deal for purchasing the lanyard hardware. I found a bag of 100 lanyard swivel hooks for only twenty bucks... what a deal..
The lanyards come together pretty fast and after making a few I figured I should work on another vintage suitcase to store them all in- and eventually sell. This $3.00 suitcase needed the slightly stained lining removed.... sad to see the lovely colored lining go, but I'm happy with the outcome of the new burlap lining.

I was fortunate to buy a bag of shabby trim that I've been coveting for a while now until just the right project.
 Of course, I had to create a price sign and a paper sign of what was being sold out of the suitcase.
 Finally, the lanyards are all finished... all 100 of them!
It's nice to close the lid on this project and start another! lol... I crack myself up :-)
big hugs,
Cheryl

8/3/18

Vintage Luggage

I love me some vintage luggage... don't you? I picked up this little beauty for $1.50. The lining inside this suitcase is in very good shape, something you don't always come across in old luggage.
 I've decided to use old luggage as containers to hold things I'm selling at craft events. Here are the dreamcatchers I just made inside the new suitcase.
 
I created a small burlap pennant to showcase the price. I glued the burlap covered chipboard pennant pieces onto leather roving using beads as a spacer, not really necessary, but felt it added a little something-something to the piece. 
I used a jewelry slip knot on the leather roving so that if at a later date I need the "price pennant" to sit higher or lower it will be an easy fix. The two outside blank pennants are eventually going to have tiny burlap and/or muslin flowers on them, but they will stay blank for now.... I also created a "Dreamcatcher" sign to help people wrap their brain around what they are seeing. *wink*
 I finished the backside of the pennants as well. I'm thinking of adding the word "SALE" in red on this side. Nothing gets people more excited than seeing that word!
I've got a stack of sewing to get to and another vintage suitcase to fill up with merchandise. Although, the next suitcase I have to rip out the lining as it is all stained with heaven knows what!
big hugs,
Cheryl