Pages


8/29/11

A new roof!

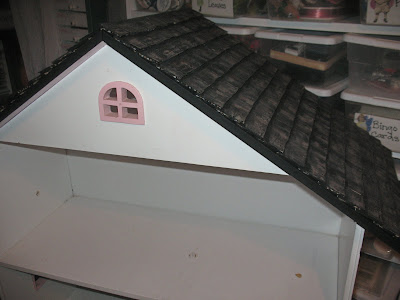
I started working on the bookcase/doll house that I recently bought at a yard sale for only $5..... I started at the top-- making a roof okokok, shingles for the roof. I used cardboard that I cut into 1-1/2 x 1 inch pieces gluing them to the dollhouse with regular household glue. Once that was finished I painted the shingles black and dry brushed some brown and tan over that creating old weathered shingles. As the dollhouse comes together I may lighten the shingles even more by dry brushing a lighter color on top of whats there already. I would love for it to look like an sweet old cottage--- but what I would like and what I can pull off are two totally different things altogether! But I'll try~~On my wish list of things to make for this house: a brick floor, a wood floor..... lace curtains, two wooden doors with windows... a planter, a tree (don't ask-- still thinking this through lol) wallpaper, molding etc...etc...etc...........

8/26/11

Crocheted Strawberries

I've been thinking about making some presents for Christmas this year. My 2 year old grandaughter really enjoys playing with the Melissa & Dougs wooden food sets. But at $20 bucks a set, and seeing how I want to get her every single one... I thought I would try to divert my attention from buying all of them--- by making some things myself. Soooooooooooooo, I whipped up some adorable crocheted strawberries. Now, strawberries are not what I would consider "fun" to play with--- but these ones you can pull off the green part from the strawberry! (which is called a calyx)Here is the crochet pattern if you would like to make your own crocheted strawberries. They are extremely easy to make. If you don't know how to crochet, you can look on you tube for an instructional video.

This strawberry is worked in continuous rounds. You can either mark the first st of every round, or just keep count as you do each stitch of each round.
Using red worsted weight yarn and an "F" hook, crochet 2ch.
1st round Skip 1ch, 6sc in next ch.
2nd round [1sc in next sc, 2sc in next sc] 3 times= 9 sts.
3rd round [1sc in each of next 2sc, 2sc in next sc] 3 times. = 12 sts.
4th round 1sc in each sc, which will equal 12 sc stitches.
5th round [1sc in each of next 3sc, 2sc in next sc] 3 times. =15 sts.
6th round [1sc in each of next 4sc, 2sc in next sc] 3 times. =18 sts.
7th round 1sc in each sc, which will equal 18 stitches.
8th round [1sc in each of next 5sc, 2sc in next sc] 3 times. =21 sts.
9th round [1sc in each of next 6sc, 2sc in next sc] 3 times. =24 sts.
10th round 1sc in each sc, which will equal 24 stitches.
11th round [2-st sc decrease] to end of round. =12 sts.
At this point, I took out my crochet hook and held the loop in place with a safety pin. I then stuffed the strawberry rather firmly. Next, I used a double length of yellow thread to attach yellow/gold beads onto the strawberry randomly across the surface. I purchased the beads at Walmart, I didn't have to use a bead needle with these. I fastened off the thread securely by attaching it to the stuffing that was on the top of the strawberry.I pulled out the safety pin that held the loop open and continued to crochet the next round.
12th round
[2-st sc decrease] to end. =6 sts. Fasten off.
Stitch from side to side of the strawberry to close the opening, tightening each stitch before making the next one. You now have a finished strawberry.
CALYX Using green worsted weight yarn and an"H" hook, I chained 3 and skipping one chain stitch I then sc in remaining two stitches. Continue with that pattern of chaining 3, skip one chain stitch, sc in remaining 2 chains until you have five completed "leaves" in a row. Then you slip stitch to the beginning chain stitch, and crochet around the opening of the green calyx pulling it tightly until the circle closes. However many single crochet or slip stitches you need to use to close the opening. For the strawberry stem, work your green yarn into the middle of the circle of leaves/calyx and chain 5, skip one chain, and sl stitch down the remaining 4 chains. Fasten off, leaving a long tail to work back under the existing stitches. Thats it... easy peasy.At this point, you can either stitch the calyx to the top of the strawberry, or add velcro to make them into something you can pull apart. I chose the latter. I used green and red permanent markers to color the white velcro circles that I was going to use for my strawberries.Next, I simply used hot glue and glued the round red velcro on the strawberry and the green velcro circle on the calyx of the strawberry.
Then I just pushed the two together, to create a "toy" Easy peasy! I'm going to modify this strawberry pattern to make some crocheted eggs next.

8/22/11

Spoon pendants

I finished a few spoon pendants. I really like how they turned out. This one is my favorite....This next one is a close second. I may have to keep this one as I love fairies and that blue sapphire is my birthstone.This one is sweet~This pendant/spoon is larger and rounder than most...It is my goal to eventually sell these on my Etsy site--
The Tarnished Crown, (which is empty) so with that in mind, I went so far as to place them onto some cards. Baby steps.... I'm having fun and isn't that the most important part? I've linked up to the following linky parties: Making the World Cuter
Made by you Monday, and also My Blue Monday.


8/18/11

Works in progress...

I've been playing with some of my jewelry stash recently. I've started off slowly, not trying to burn myself out before even starting. I began by making these three fairy brooches. They are still works in progress~ Here is another...This little cutie is just screaming for a party hat....Thats as far as I got with those...I got bored.
Then I turned my attention to making some spoon charms. Firstly, I had to bend them...Then I had to cut them and bend a loop to create a hanger so they could be turned into charms. Thats as far as I got with those... yep, I got bored with making those as well.Next, I turned my attention to making some dominoe pendants. I've wanted to make some dominoe pendants for-eva.... I looked at several images of finished dominoes... and noticing most had one hole at the top and anywhere from one to three holes at the bottom to hang charms or crystals... I was in need of a drill press to create precise holes in the dominoes. Trying to hold a big drill and drill a teeny-tiny hole into something small isn't easy. I've seen table top drill presses on other blogs, but never paid to much attention to really looking at them, or even better yet... asking the blogger where they got them. So, I was on a mission to acquire one! Firstly, I googled the following words: drill press, small drill press, mini drill press. Nothing that showed up that was even remotely close to what I wanted. Next, I searched local hardware stores online to see if they carried small drill presses. Nope. I did however spot something that is called a drill holder. Cool. I bought this at Harbor Freight for only $20. It can be free standing or you can mount it to something to keep it steady. I had my husband cut some thick plywood for me so I could screw the drill press to it. I decided to spruce it up a smidge seeing how I plan on keeping this for. ever. Since this is essentially a tool, I decided to give the base an old-old metal look. Of course metal tape is a super easy way to create some metal-magic in a snap. First thing I did was to cover the entire base with metal tape wrapping around the edges with a little attached to the backside. For fun, I glued some thin wooden flowers and some chipboard dots, that I punched with a hole puncher, around the edge of the board.Once the glue set on the flowers & dots, I added some more metal tape to cover the embellishments. Then at every overlap of the metal tape, I used a rotary marking wheel to create little holes like rivet marks. I then used acrylic paint to age the metal.... taaaaaaaaaa daaaaaaaaaaaaa. Instant drill press. Isn't she a beaut? *sigh* Thats as far as I got.... I got bored with that. I couldn't even bring myself to dig out some dominoes and give it a try.
I think tomorrow I'll drag out my sewing machine~

8/15/11

Sunday Sailing

We took a drive to San Juan Batista for the yearly antique street fair they host every year in August. The houses that are surrounding the event have your usual yard sale things for sale-- which is where I purchased all of that things I bought! I made a new fabric shopping cart insert for the occasion, my other one was plum worn out! I used a floral shower curtain that I cut apart and repurposed as the liner. I updated my "Artsy Fartsy" sign as well--- bigger than ev-va! There was some fabulous antique and vintage things to look at-- This lovely dress form was $500.00.... LOVE IT!Isn't this a cute way to sell vintage buttons?Look at this over-the-top-cute dog bed made using an old vintage piece of luggage...This van was something that immediately caught my attention. It is covered with aluminum foil!! LOVE-LOVE IT!and its for sale!! I just love the texture on it, I could see my '66 Mustang covered in foil..... I'm just sayin'...
I did manage to find some treasures to haul home. I bought this jewelry for $5 and the three spoons for $1. The rocks were $2, I always buy rocks whenever I see them being sold so cheaply-- I have them in my yard so my grandkids can find them. If they are going to collect rocks, for even sakes, they are going to collect cute ones!My husband bought his clock for only a $1-- it works, so now I guess I have to clean it!This step stool chair was $2, I'm going to paint the metal and cover the step and seat part with something cute... I was wanting/needing a higher seat/stool in my studio, so hopefully this one will work. (I've yet to try it out because its so dirty!)These odds and ends were only $3..... the teeny-tiny flower frog is something I've never seen before.Here is a slideshow of some random pictures from the antique fair.

It was a fun afternoon even though it was really H-O-T. It was a real eye opener at how much all the "blingy" jewelry sells for. I guess from now on I won't wrinkle my nose and PASS up all the "blingy" jewelry I find at yard sales that they are only asking a buck each for. I've linked up with Freckled Laundry's "Air your Laundry" linky party.

8/11/11

Crazy quilt

My friend Ann gave me a quilt that had been given to her mother years & years ago and was in her estate after she passed away. When she came across these quilt squares, knowing how much I love things like this... she asked me if I wanted them. *goose-pimply-gasp* It is so hard to come off as being gracefully thankful, when your head is telling you to jump for joy and squeal with delight! The writing on the brown paper it was wrapped in said, "From the late 1890's" Look at all the fabulous fabric that is pieced together.... All in all, there is 13 squares of this crazy quilt, with a handful of cut pieces in the mix. I am thinking about making some tote bags with these squares, but for now, I'm just enjoying having them as they are! What a wonderful gift I was given! Thank you very much Ann, how extremely generous you are!