Pages


12/31/10

New Years eve party.....

I attended a new years eve party online this year. The party was hosted by 
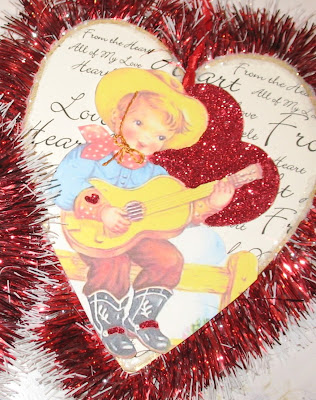
Paula Clare. There was a list of things everyone was to make... Cowboy tags, a gnome shadow box & gnome tag and a vintage camper tag. Here are the cowboy tags I made. I'm going to tie these onto some valentine gifts for my two grandchildren. There is a piece of foam core sandwiched in between the front and back of each tag-- which is where I have the garland glued in place around the edge. I colored the hair on the little girl from blonde to brown~ From the looks of this photo, I need to add some more color to the hair. I added super fine red glitter to everything red and I also added some thick embroidery floss as the rope in her hand. When I go ink her hair a little more, I think I'll add a real blue bow to the dogs collar. I also added red glitter on the little boy tag along with embroidery floss as the chin strap for his hat. I added thick glue pop dots to make them pop off the tag a little bit. Here is the camper I made.... I didn't make a gnome tag-- so I just added a gnome to this camper tag and I'm calling it g-o-o-d! I made the camper using metal tape. You wouldn't know by looking at this camper that its made out of some thin cardboard I got from a large box of pudding cups. Recycling at its best.
Lastly, my gnome shadow box. I made the box using an old game board. I added 4 bells on the bottom of the box as feet. I glued a necklace around the outside of the box that says "kiss me... hug me" The paper gnome I downloaded offline and just added red glitter to his hat. Easy-peasy.
Well, I must say, I've enjoyed myself at this online party. Thanks for hosting such a fun event Paula.

12/30/10

Valentine tag swap~

For this upcoming Valentines day... howza'bout a "Tag for Tag" valentine swap? No large box filled with chocolates, bits of vintage trim and buttons-- you know how crazy we can all get sending stuff in the mail... This is just one valentine tag swapped for one valentine tag. Easy-peasy.... I would like to swap 20 tags-- I already have 4 committed. So if there are 16 more willing to participate.... bring it on :-) Date to be mailed out by would be February the 1rst... or 2nd....ok, or 3rd. Keeping it easy-peasy! Make sure you leave me your email address so I can get in contact with you. Thanks :-)
The swap is now filled/closed~ Thank you to the 20 people who signed up!

12/24/10

Merry Christmas...

I hope everyone has a super-fabulous-joyous Christmas! May all your prezzies be pink, warm and fuzzy~Muuuuuuuuuaaaaaaaaaaaaaaaahhhhhhhhh~

12/23/10

Tiny Teddies Treehouse

I've been poking around online looking at some fabulous blogs/websites that showcase miniature houses that people have made. I am amazed at the talent that is out there in the mini world. I started to build my own little dollhouse from the ground up about 6 years ago. I only got so far with it when I got bored working on it and set it aside.... Its time to get going on it once again. Its not a traditional house by any means.... I made it to look like a tree stump. It is going to be the home of this little 4 inch teddy bear that I was given after my grandfather passed away when I was fifteen. Ok, I wasn't actually given this teddy bear... I got it because no one else wanted it... I have built two miniature doll houses in the past using boxed kits that had detailed instructions and materials included. This miniature tree house was built/created by me. The scale used in this house is one I like to call "cute scale." If I think its cute... its going to work. The frame used for this miniature tree house was a tall laundry hamper. You can see the actual laundry hamper in the process of being converted into a tree stump in the photo below. I turned the hamper upside down so that it looked like a tapered tree. (sorry about the quality of these photos)
I then drew two lines from the bottom to the top of the hamper so that there will be a large opening into the tree house. I kept the portion that was cut out, that will be reattached with hinges later. I then used the jigsaw to cut off the bottom (which is now the top) completely off. Once the basic shape of the tree was finished and the floors and window openings in place... I covered the entire laundry hamper with paper mache using newspaper. Once that layer was dried, I added another layer using brown paper bags giving it more support.
I created the curving staircases using illustration board. I'm thinking about swapping them out and just making ladders using sticks & twigs.... the stairs take up valuable furniture space!! With all the fantastic miniaturists out there to keep me inspired, who knows, I just might finish this! Its going to be a fun ongoing project for the upcoming year!

12/22/10

Santa baby....

I've been trying to use the last little bit of black ink that is left in my color copier before replacing it with another $60 dollar cartridge. eek. Anywho, I printed off some black & white vintage images of Santa off of the web and glued them to some chip board and then added some super fine red glitter to Santa's outfit in each picture. I spray painted some small cloths pins red-- and then put them back together and used them to clip the Santa pictures to some super fat white ric-rac with some baby ric rac running down the middle. I've got it stung up in my hallway~ Taaaaaaa daaaaaaaaa instant cuteness! Some of the images are of my two grandchildren when they were sitting with Santa--- my 18 month old grandaughter was the first to notice that by saying, "Thats brud-der."


12/16/10

Tippie Toe~

I picked up a pair of brand new childrens black ballet slippers at a yard sale for .25¢ a few weeks ago. I had remembered seeing some ballet slippers somewhere on the web where someone had taken a pair and made them look old. I wanted to try my hand at it... and for .25¢ I couldn't resist. Firstly, I went over the black slippers with gold paint~ Using what I had on hand in my large stash of stuff... I made some ruffles using some off-white fabric. I wet the fabric and then just squirted some black paint onto it and began rolling it around in my hands until it was black. I wanted to add some black pom-poms... and of course, I only had white ones. So, I did the same thing to the white pom-poms to make them black.I used cardstock inserts which I covered with muslin fabric along the sides and the bottom to stiffen up the ballet shoes a little bit. Then I just dirtied them up with some watered down paint, giving them the appearance they had been worn for years in different ballet performances. I had intended to put them under a cloche-- but for the life of me, I couldn't find where I put the wooden base that went with it...... then I thought, a large jar filled with mica flakes. Um, where are my mica flakes? I betcha next to the cloche base.....

12/13/10

Away in a Manger....

Away in a manger,no crib for His bed......The little Lord Jesus
lay down his sweet head.....The stars in the skylooked down where He lay The little Lord Jesus,
asleep on the hay.

The cattle are lowing,the poor Baby wakes,

But little Lord Jesus,no crying He makes;I love Thee, Lord Jesus,look down from the sky

And stay by my cradle
till morning is nigh.

Be near me, Lord Jesus,
I ask Thee to stay, Close by me forever,
and love me, I pray!
Bless all the dear children
in Thy tender careAnd take us to heaven,to Live with Thee there.

12/11/10

Peppermint Paradise

I have been stalking visiting the sweetest of blogs hourly lately. Everybody probably already knows about "Bluebird Papercrafts" with the super talented Elizabeth at the helm. What an absolute delight she is with her beautifully written posts and her creativity that is awe inspiring. Anywho, long story short, I whipped up some of the delightful Christmas ornaments she has on her blog. I've never been a big fan of felt... now I'm digging it :-) I made a ice skater in baby blue.....Loved it soooo much I made a bunch more.
I made an ice skater in red as well. (this one was supposed to be sitting on a round sled, but I just wasn't loving it, so I stuck skates on her) Thought this was just to darling to just have one of...so of course, I made a bunch more of them as well. Do you see a pattern here? This is why I no longer bake COOKIES! I also finished making 20 red-nosed reindeer finger puppets. Here is a close-up~
I'm having way to much fun! What to work on next?

12/9/10

Christmas Cards

I finally finished this years Christmas cards... here are just a few of the ones I've still got to wrap up and take to the post office. Here is what it looks like when you open it up....here is the backside...here it is folded back together....
retied up ready to be wrapped and mailed. Thank goodness I have grandchildren or else it would be filled with photos of my cats ;-P

12/5/10

Pictures with Santa~

I took my two grandkids to see Santa today~ Jonathan and Santa are bff's ....Santa heard what a naughty lil' girl Miss Chloe has been this past year. Miss Chloe dispite the tears was unable to get back onto the "good girl" list.
Not to worry Chloe, Nana's got your back~