Pages


12/30/21

Tree Stump W.I.P.

The tree stump with shelves is coming along nicely. Last post I showed the tree stump covered with masking tape-- the next step was a layer of paper. I don't get a daily newspaper anymore so I use brown paper lunch bags when I paper mache anything. I use heavy duty paper bags (from grocery stores) when I'm needing to add more strength to a piece. You can see in this photo that I did decide to add some lights. I couldn't find any out in the wild-- so I shopped my house and of course I found two ten light strands still new in the box in my garage. Yet, one more reason for me to get a new house with a three car garage *sigh*It wasn't that difficult to add the lights, but it was very-very time consuming.I had to cut holes in each shelf to feed the wires through-- and hide the extra bulk of wire in one wall all the way down the stump. It just needed more foil, tape and then the lunch sacks to cover it all up. Easy peasy.The base where the two plugs were joined was bulky so I had to build the stump root out a little bit more to help mask that part... I added a lot of cardboard over the top plug to hide that piece and now just the bottom plug is visible. The last step on the exterior was to add bark to the tree stump. I used paper towels dipped in white glue to create the trees bark texture.


Seeing how the tree stump was almost finished, I of course, started a new project! Tiny little fairy houses made using small Pringle cans. Once I made a bunch of those, it was back to the tree stump! On the inside of the tree stump I created a smooth wall surface using spackling paste. Next, I tore apart some Styrofoam cups to create a cobble stone floor... a quick coat of black paint..... and time to take a break from this project for a little bit!

I think I'll go  play with the fairy houses that I started :-)

12/16/21

I meant to blog....

I had an awesome time at the big event I recently had been a vendor at.... way back in October, I had every intention of blogging about it. Boy--- time gets away from me! I had so much fun in fact that I'm going to be doing it again in March. 

I had planned to take photos-- but I never got around to it. I sold a lot of my wire wrapped jewelry and practically all the wishing wands I had made. Oh well, next time I'll take photos... but don't quote me on that.

I have decided to create a woodland/fairy theme for the next event so, I'm making a tree stump with shelves in it to showcase some small things that I hope to create one of these days!

I created the base for the tree stump using cardboard, aluminum foil and tape.


Next, the entire tree stump will get a layer of paper on it, then I can add the bark texture/paint to the stump to really make it come alive. For the shelves themselves, I'm thinking of creating a rock cobblestone effect. Oh... and possibly add some lights! Goodness, this little project is turning into a large undertaking! At some point I'm needing to actually create things to sell at this event instead of playing around :-)


9/14/21

A tutorial for making Wishing Wands

I've made a large batch of "Wishing Wands" and thought I'd take a few photos along the way on my second batch so that those of you wanting to make your own would see how I created mine.The first batch of wishing wands I created I wanted them to have a fairy vibe, so I added a vine that wraps around each wand along with moss, rhinestones and glitter. Of course the all important label proclaiming they are "Wishing Wands"The following tutorial for the wands doesn't show how I created the vines, I wanted these wands to look like plain ol' sticks. If your interested, in how I made them... continue reading :-)

The supplies are readily available at any dollar store and craft store. For the actual wand itself, I used a 10 pack of wooden dowels I got from the Dollar Tree. I used a pencil sharpener to create a pointed end to each dowel. I also picked up some florist wire there too. The string of crystals I had purchased from Joann Fabrics. You will also be needing hot glue and paint.  Firstly, your needing to cut a small piece of the craft wire and string it through the hole in the crystal your wanting to use. You will be using this to wrap around the wooden dowel to ensure the crystal won't pop off of the wand in years to come. Next, you wrap the wire around the dowel. Just a quick wrap will do....You can use painters tape or masking tape to help attach the wired crystal to the wooden dowel. I place the tape over the bottom of the crystal to cover up the wire coming through the holes. This helps to stabilize the connection of the crystal to the dowel. It is already looking like a wand. Once you have your wands constructed, your going to need your glue gun to transform the wooden dowel into something that resembles a wooden stick.  I like to start with running a line of hot glue around the crystal on top of the tape. I then start adding glue down the dowel to about mid point and then stick that in a container to let the glue set up. I then repeat that a few times to build up a fatter area around the crystal. Once the top is looking great, I then work from the middle down to the point. If you get high bits in the glue that don't look so good, simply take the hot tip of your glue gun (no need to squeeze out any glue) and let the hot tip remelt the areas your not liking. Easy peasy~Now comes the fun part where you get to paint your wands! I find that regular craft paint doesn't stick easily to hot glue. You can do it, but your going to be putting on a lot of coats of paint. I covered each crystal with some painters tape, and spray painted each one with some brown paint.
You'll find that the spray painted hot glue ends up feeling sticky/tacky, but once you paint over it with acrylic paint that goes away.  I painted a light wash of color on each wand trying to create the look of wood.  I used a mixture of black, nutmeg brown and a lite Mocha. Any color combination that would make the wands look like wood would work. I used a paint brush- but I found just rubbing the wands with paint on my finger tip gave me a more natural look of wood.The flash of the camera distorts the colors, in person, they really look like wood.I'll be attaching a printed label that reads, "Wishing Wands" on these as well. Because, you know... these are for wishes. *wink* Wouldn't a wishing wand be adorable attached to the top of a baby shower gift? a wedding gift???  a graduation gift?... You could even  send one along with a Christmas card that read, "I wish you a Merry Christmas"

I'll be selling these wands at the upcoming Gem and Mineral sale I'll be participating in next month. I'll be selling them for $5.00 each :-)

9/8/21

Happy Birthday to me!

Boy, I sure am missing having parties at my house... *sigh* I was hoping things would be getting back to a safe normal-- but I think that is still a ways away~

To help me celebrate my birthday this year, I got myself a life size pirate skeleton to sit in my den. When I bought this fella, he was naked and bald. Now he is fully clothed and has a little bit of hair to call his own. Doesn't he look handsome?

The shirt I got for the skeleton to wear is actually a vampire shirt but I felt it looked very piratey. (The shirt is called, "Very cool Vampire" if anyone wants to look as dapper as this fella this Halloween. I got it from "California Costumes")I also got the sign that reads "Captains Quarters"... I was going to put it on my bedroom door but I just plunked it down by all the other pirate stuff for now. I was playing in this area de-cluttering it, if you can believe that! One mans junk is another mans pirate treasure! I've still got a lot of dusting to do--- blah--- I'd rather do anything than dust! So what did I do? I cleaned out my fish tank.......my 36 gallon bow front fish tank. I love that tank. That took me ALL. DAY. LONG. Sheesh, I would have been better off dusting! I've never done a water change or a deep clean of the tank and felt it was time. It wasn't stinky or anything--- basically, I was needing an excuse to redecorate it *wink* I only have two fish left in this big tank, a dwarf Otocinclus Catfish and a tiger barb. I also have a tiny ghost shrimp. But that doesn't count because you only see it once a week if your lucky.Here is a close up. Very pretty if I do say so myself :-) I purchased a new filter that is super quiet and a new heater for the tank too. I'm going to let it settle for a few weeks to build up some good bacteria before I add some new fish.Once the tank was clean, I got busy making outfits for two smaller skeletons I picked up along with the larger one. One is battery operated and says a bunch of funny things like, "I'd go inside with you, but I don't have the guts" I also added a red velvet jacket to the daddy skeleton that I got long ago from the same company as the shirt he is wearing. I think the family looks adorable. I've got another pirate in the garage that moves and talks... I may bring that in and make it into the mommy. I've also got a skeleton kitty and puppy... yes, I'll be bringing those into the scene too. 

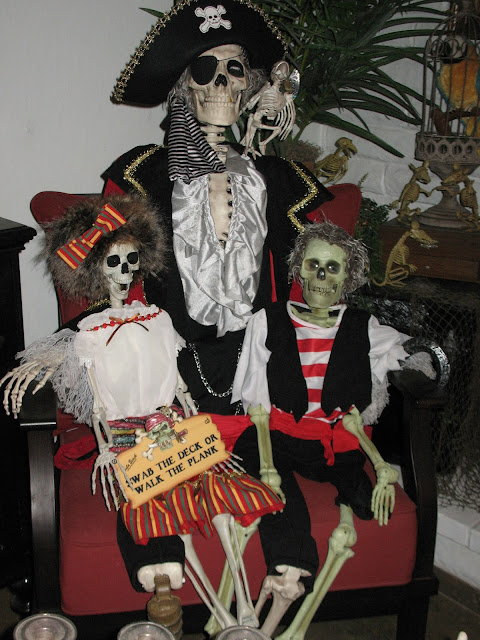
Yesterday, I was gifted two Pirates of the Caribbean flags that are attached to swords and the little sign the skeleton girl is holding that reads "Swab the deck or walk the plank" What perfect gifts!!! Such generous souls out there!

I hung one sword/flag on the edge of a huge antique framed map that is over my fire place. 
I'm needing to figure out where to place the other one, but for now it sits on the coffee table.

I also bought myself an antique doll this past week. What a cutie pie! I wasn't planning on buying her even though she was only priced at $10... nope, wasn't going to get her. I don't need her, nope.... let someone else get the great deal, and was walking away... then it happened. The blasted... "Oh, you can take it for $5" Gawh, OK. So, here she is. Her name? Her name is "Lucky Eight"She looks like an antique Horseman doll--she is 22" long and is partially made from composition and cloth and has sleepy eyes/closed mouth. I haven't looked at the back of her neck for any markings. One day I'm sure I'll get curious enough to research her, but for now, she just makes me smile. I have a small collection of antique dolls, whats one more.*wink* That mentality of "whats one more" is going to catch up with me one day lol 

This week has been a good start to my birthday month. Like I do every year, I've got a list of stores I'm going to hit up to buy myself things I'm wanting. I mean, I shop all.the.time... but this is special because I've got an actual list of things I'm going to get instead of just buying what catches my eye... I crack myself up LOL

9/3/21

Wire Earrings

I have 35 more days until the huge four day selling event that I'm going to participate in takes place. I range from..."I've got this" to "I need to make things to sell, and fast!" In order to appease both of those feelings/emotions, I cranked out some wire and bead earrings.
I do love to make multiples...

I must admit, I do have a super hard time with creating a natural boho  look/feel. I did try... but then my OCD took over and I took the "free flow" and got it down to a precise wrap.... I crack myself up. I'll be selling these for $5 each... or two for $8.

8/25/21

I just stepped away for a hot minute.........

My goodness.... I stepped away from my blog for a hot minute-- and almost 7 months have passed... eiy-eiy-eiy....

I have signed up to do a four day craft event in October with the gem and mineral club I belong to. The majority of items each vendor can sell should be "rock related" seeing how we are a rock club. When I initially signed up, the pandemic seemed to be easing up somewhat, and I was hopeful that the worst was behind us. Well, we all know now that the crisis is on the rise once again..... sigh.... I'm a maker, and as you all know, "A maker's gotta make" so that is what I'm going to continue to do.

I found these adorable little red pickup truck stickers with Santa driving at Hobby Lobby. Are they not the cutest?
I pulled off the 3 dimensional sticky tape on the backside and used E6000 to adhere the little truck to a wooden slab. I then glued itty-bitty rocks in the trucks bed in front of the Christmas tree. Adorable! Well, if your passionate about rocks that is :-) After the truck was all decked out, I hot glued pipe cleaner greenery around the slab... ta da.... instant rock collector Christmas ornament! I made a bunch of ornaments and packaged them up on various tartan papers. Each one has a piece of twine at the top to hang the ornament from-- I've got the twine tucked behind each ornament so it doesn't get in the way of seeing the cuteness of each piece.I am planning on having my table decked out with galvanized metal containers and bowls etc...I pulled out this fabulous Birds & Branches tray from my garage, hence the dust. I love owning this little piece of art....  even though up to now, it was just on a shelf in my garage! This particular tray is pretty large measuring in at 12 x 21 inches. They don't sell this size anymore, they only have the smaller ones available. If your interested in getting one similar you can check out "Star Home Designs" They sell some super cute items! I think the tray will tie in nicely with all the galvanized pieces I've been buying and stashing in bins to use at the event. Honestly, I don't even recall what I've bought :-P

1/13/21

Tree house part 2

I've been working a little bit on my tree stump miniature house. You can find part 1 here. I used paper towels soaked in a mixture of half glue and half water to create the bark on the stump.

I've still got the capability to remove the door, this makes it super easy to really get inside the miniature house and continue to work on it-- plus, once it is all finished, I will have easy access for decorating!The second floor is just two layers of super strong cardboard. I had to cover up the edges to give it a clean edge. The second floor is going to have a wooden planked floor. I'm needing to create two sets of stairs. One from the bottom floor to the second, the other from the second floor to the topside of the tree stump. Of course, I am wanting a spiral staircase... juries still out on that one!Here is another view.... I'm going to create a flagstone area on the flat part on the front of the tree stump. I'm also going to add rocks to the fireplace to spruce that up. I'm looking forward to getting the structure finished so I can get to the fun part of decorating it!

1/1/21

Happy New Year!

 
So I reread my post for the start of 2020 and realized I hadn't accomplished any of the things I set out to do. Who would have thought that doing every day normal things could put you in a situation that could potentially kill you. Wow. Shakes you to your very core-- if you linger in those thoughts for to long

For 2021, I'm not going to have any expectations or goals that I aspire too/for... I'm just going to choose a word for the year. Like so many-- I'm choosing the word: HOPE... and in conjunction with hope, obviously FAITH.


With hope and faith, it is easy to feel that 2021 is going to be an amazingly beautiful year.